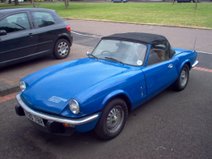
I've been at it again - thinking about my cars aesthetics! My latest purchase is a new number plate for the front of my Spitfire.
I've been messing around with the front of the car since I bought it! When I first got it it came with an absolutely massive plate that blocked off virtually the whole of the radiator grill. Unsurprisingly there were some cooling issues! I'm sure they were largely due to the radiator, which was standard size and looked like it had seen better days, but the huge plate didn't help!
To sort it I fitted a wide radiator and cut the edges of the plates off, leaving the minimum legal distance between letters and the edge of the plates. The cooling problems were sorted but I still wasn't happy with how it looked. There was only so much chopping down I could do with the letters as big as they were (way bigger than the legal minimum size!) and I was left with square edges on each side which looked a bit odd! Something had to be done...
I looked at various options. Stick on plates didn't do it for me. I don't like the way they look mounted almost horizontally on the bonnet. I don't like the look of plates mounted on the spoiler either so that only left me with the option of using a smaller plate in the standard location.
This is where things got a little bit err....complex. In order to get what I wanted I was going to have to bend and break a few laws. Basically, I wanted a 3/4 size plates and these aren't strictly road legal. After doing my homework and looking on a few forums I couldn't find anyone that had been pulled over for having a smaller front plate so I decided to go for it.
This led me to the next problem. Getting number plates made is supposed to involve lots of hassle with ID and proof of ownership and stuff. The way the number plate sellers get around this is by selling plates that are for 'show' only. So without all that hassle I got http://www.fancyplates.com/ to make one up for me. It looks great and arrived the next day. So for good service they get recommended by me!
Sunday, April 20, 2008


Saturday, February 09, 2008
Roller Rockers
I've been busy this week looking out for parts going cheap! I'm going to have a few jobs to do on the Spitfire in the future and I really want to get all the parts aquired so I can just do it next time I've got some time off. One of these little jobs has been brought about by a steady drip of oil under the car. It can only be coming from the rear oil seal so basically either the engine or the gearbox will have to come out to fit a new one. I'm not in the business of doing anything by halves either so there will be a mass upgrading in that area while the engine is out. I'm going to go for one of those light flywheels (either a Canleys steel or a Firdanza alloy one) and an alloy bellhousing. Of course I'll chuck in the AP clutch and the alloy backplate I've already got, bolt it all back together (I've heard Chevy flywheel bolts are a good upgrade) and I should be good to go!
My other little job is to finish off my cylinder head. I still need to finish the exhaust ports off and get a pro to fit bigger valves for me. Basically the lot need doing. It need new guides, valves and springs. It's sounding more expensive by the second!
Despite saying only recenly that I would be smoothing and polishing some rockers up I had a change of plan. Ebay turned up some Harland Sharp roller rockers that were going suprisingly cheaply. A bargain for just £84! I love Ebay!

My other little job is to finish off my cylinder head. I still need to finish the exhaust ports off and get a pro to fit bigger valves for me. Basically the lot need doing. It need new guides, valves and springs. It's sounding more expensive by the second!
Despite saying only recenly that I would be smoothing and polishing some rockers up I had a change of plan. Ebay turned up some Harland Sharp roller rockers that were going suprisingly cheaply. A bargain for just £84! I love Ebay!
Thursday, January 24, 2008
Wheels!
I've finally got around to something I've been meaning to do for ages! After all this time I've finally joined Club Triumph! Now if I can only stay in the country long enough I can enter the RBRR or maybe even the 10CR!


For some reason it now looks a bit higher off the ground than it did before. I rolled it backwards and forwards to let the suspension settle but it still seems to sit higher than before. I'll have to take it for a run and see how it looks after that before I decide what to do about it. I can just wind the AVO's down at the front but it looks like I may have to fit a lowering block at the rear. Thats another project for another time!
I've also recently joined Davesideways' new forum (http://www.sideways-technologies.co.uk/) and it looks to be shaping up quite nicely as good read for people who love their modified classics. I've already had a few more ideas that I will get around to another time. With me being on the other side of the world I don't think this is going to get updated too often over the next few months but I may have some news about parts I'm trying to aquire. Watch this space!
I also finally got around to finishing off my slotmags. I was in a mad rush to get them done and on the car before I had to return to New Zealand. I had a morning to apply the last coats of paint, get them balanced and then finally fit them to the car! It seemed like mission impossible but I got it done just in time to take a few photos, pack my stuff and get on the plane! Of course there were a few hitches along the way. I couldn't get my hydraulic trolley jack under the front crossmember because the car's too low so I had to use a screw jack to raise it a couple of inches before I could slide the trolley jack under. I still need to polish the rims some more and I really need to get hold of some centre finishers to finish the job off but I think it looks pretty cool!
For some reason it now looks a bit higher off the ground than it did before. I rolled it backwards and forwards to let the suspension settle but it still seems to sit higher than before. I'll have to take it for a run and see how it looks after that before I decide what to do about it. I can just wind the AVO's down at the front but it looks like I may have to fit a lowering block at the rear. Thats another project for another time!
I've also recently joined Davesideways' new forum (http://www.sideways-technologies.co.uk/) and it looks to be shaping up quite nicely as good read for people who love their modified classics. I've already had a few more ideas that I will get around to another time. With me being on the other side of the world I don't think this is going to get updated too often over the next few months but I may have some news about parts I'm trying to aquire. Watch this space!
Thursday, January 10, 2008
Finally! An Update!
Okay so its been a long time coming but here's the first update in quite some time! I've been busy over christmas but not on the car sadly...

I also thought I'd treat myself to an alloy alternator bracket (again from Canley Classics). I know its not going to save a tonne of weight but it sure does look cool!
 I've also had a chance to check out the rocker spacers. I might well take the rocker shaft out and rebuild it while I'm out in NZ to give me something to do on the boring days I'm not flying! I may even take the Dremel out there and smooth and polish the rockers up!


 And finally a request for help! Anyone know how to remove the standard type of mirrors that come come on a Spitfire? I've only got one on the drivers side and theres a screw sunk into a recess on the back of it but it dosent seem to want to move! Do I have to get at it from the inside of the door?
I got back from NZ on the 28th of November and since then seeing the girlfriend, christmas and pilot exams have all taken their toll on my spare time but that dosent mean I havent been busy getting a few bits sorted out for the car!
I've always said that that time and money are the two biggest factors in how I work on my car. Sometimes I've got time and no money so I lighten up some stuff or do a few little jobs and sometimes I've got more money than time and I buy some nice shiny bits! I've not had the time recently so the shiny bits have been rolling in!
Here's a few bits and bobs I've recently aquired. First off is something I've been after for a while - an alloy engine backplate. I bought one of these from Dave 'Sideways' Powell a while back but postal incompetance meant that it never arrived so I bought one from Canley Classics the other week.
Wierdly it looks smaller when it's not on the car! Looks nicely made with all the holes in the right place so it gets the thumbs up from me! Not planning to fit it at the moment so I'll probably just chuck it in the parts box untill I can fit it. I'll probably leave it till I replace the clutch and chuck in a lightweight flywheel, race clutch, alloy bellhousing etc etc.
I also thought I'd treat myself to an alloy alternator bracket (again from Canley Classics). I know its not going to save a tonne of weight but it sure does look cool!
I've also had a chance to check out the rocker spacers. I might well take the rocker shaft out and rebuild it while I'm out in NZ to give me something to do on the boring days I'm not flying! I may even take the Dremel out there and smooth and polish the rockers up!I've also been working on the wheels I bought. It's been an epic mission to strip all the old paint off. There were about four layers and each seemed to be better applied than the last. It took a whole bottle of nitromoors to get it sorted and even then it took an epic amount of time with wire wool and wire brushes to get the final bits of paint off! I'm still finishing them off but one is painted up nicely and the result is pretty good. What do you think?
Of course I had to get some nuts to bolt them up. I will eventually upgrade the studs, but for now I bought nuts to fit the standard size studs. I got them from Speedshack and I can thoroughly recommend them. They knew exactly what they were talking about and got them delivered in double quick time so they get a recommendation from me!
I'm also trying to fit the 'all orange' indicators that 'GT6Steve' sent me from Las Vegas but I've run into a bit of a stumbling block. It seems that the fitment of them to a UK spec spit is not as straightforward as it would seem. The bulb holding back part of the light is bigger than the UK ones so it needs the hole opening up with the trusty Dremel!
And finally a request for help! Anyone know how to remove the standard type of mirrors that come come on a Spitfire? I've only got one on the drivers side and theres a screw sunk into a recess on the back of it but it dosent seem to want to move! Do I have to get at it from the inside of the door?Wednesday, November 07, 2007
Magnificent!
Finally some luck came my way! I was having a look on ebay when I came across this set of 6x13 Wolfrace slotmags going for just £80. Should be absolutely perfect fit on the Spitfire and they're already fitted with 4 Yokohama Advan A032R tyres. Perfect for the type of driving I've got in mind!
I should be returning to the UK at the end of this month and I plan to get the spitfire drivable again in the short time I'm at home. Bleeding the brakes and refurbing and fitting the wheels are my number one jobs.
Here's the picture from the ebay listing. As you can see these are the original Wolfrace wheels with the squarer slots. I was planning to go for the Alleycat slots with the more rounded holes but I eventually decided the squarer holes would suit the car better. I plan to spray the centres black (or possibly anthracite) and polish the rims to a high shine. Can't wait to see how it looks!

I should be returning to the UK at the end of this month and I plan to get the spitfire drivable again in the short time I'm at home. Bleeding the brakes and refurbing and fitting the wheels are my number one jobs.
Here's the picture from the ebay listing. As you can see these are the original Wolfrace wheels with the squarer slots. I was planning to go for the Alleycat slots with the more rounded holes but I eventually decided the squarer holes would suit the car better. I plan to spray the centres black (or possibly anthracite) and polish the rims to a high shine. Can't wait to see how it looks!
Wednesday, September 12, 2007
Plans
Not being in the UK has been a major disadvantage this month! There was a set of Alleycat slot mags (5.5J size) for sale on ebay and they looked to be in decent condition with Pirelli tyres. The guy wanted them collecting though and thats a little difficult with me out of the country! It's a real shame as they would have been ideal for refurbishing and fitting to my car. Oh well, I'm sure something else will come along!
I've also got my eye on a pair of Halogen headlights with built in sidelights so that I can finally get around to fitting up the US style indicators that 'GT6Steve' sent me over from the US. It seems to be the same light unit as a Mini so I'm just shopping around for the cheapest supplier at the moment but will place an order soon!
Also about to be purchased is another essential for my 'killer' top end rebuild. I'm ordering a set of steel spacers for the rocker shaft from Moss Europe. Should give me a more positive location of the rockers than the springs that are fitted as standard. The spacer set is a bargain at around £12 but plus the postage and VAT is more like £22. Obviously VAT isn't their fault but that makes the postage the best part of £8. Seriously, how do these companies get away with it?
I've also got my eye on a pair of Halogen headlights with built in sidelights so that I can finally get around to fitting up the US style indicators that 'GT6Steve' sent me over from the US. It seems to be the same light unit as a Mini so I'm just shopping around for the cheapest supplier at the moment but will place an order soon!
Also about to be purchased is another essential for my 'killer' top end rebuild. I'm ordering a set of steel spacers for the rocker shaft from Moss Europe. Should give me a more positive location of the rockers than the springs that are fitted as standard. The spacer set is a bargain at around £12 but plus the postage and VAT is more like £22. Obviously VAT isn't their fault but that makes the postage the best part of £8. Seriously, how do these companies get away with it?
Monday, August 06, 2007
Valve Caps
I'm still really busy flying planes at the minute but I've still managed to fit in some shopping for Triumph parts!
I have been meaning to do some more work on the top end of my engine for some time now and my new 'killer' cylinder head is just the excuse I need to do it! Theres no point in putting so much effort into modding a cylinder head only to build it up with the standard Spitfire 1500 rocker gear!
I'm going to keep the standard rocker shaft (although obviously I'll replace it if it's knackered!) and either use polished standard rockers or roller rockers from TSI Imported Auto along with a TriumphTune (Moss Europe) rocker spacer kit to more positively locate the rockers over the valves. I've just bought these alloy valve caps from ANG Triumph. I'm not sure how much difference they'll make and if they aren't sufficiently strong they could cause an expensive mess! Apparently they are half the weight of the standard steel caps though so I'm going to reserve judgement on them till I'm back in the UK and can check them out myself. I'll probably lighten my cam followers and fit tubular pushrods and call the job a good 'un!

I have been meaning to do some more work on the top end of my engine for some time now and my new 'killer' cylinder head is just the excuse I need to do it! Theres no point in putting so much effort into modding a cylinder head only to build it up with the standard Spitfire 1500 rocker gear!
I'm going to keep the standard rocker shaft (although obviously I'll replace it if it's knackered!) and either use polished standard rockers or roller rockers from TSI Imported Auto along with a TriumphTune (Moss Europe) rocker spacer kit to more positively locate the rockers over the valves. I've just bought these alloy valve caps from ANG Triumph. I'm not sure how much difference they'll make and if they aren't sufficiently strong they could cause an expensive mess! Apparently they are half the weight of the standard steel caps though so I'm going to reserve judgement on them till I'm back in the UK and can check them out myself. I'll probably lighten my cam followers and fit tubular pushrods and call the job a good 'un!
Sunday, July 15, 2007
More future mods!
Okay, so here I am posting after saying that I wouldn't be adding anything to this blog for at least 6 months! I have a fair bit of spare time and I thought I'd use it to introduce some of my future plans for the car by outlining just a couple of future mods per month! Here are this months 2 mods then!
I need to get my bonnet sorted because the inner wheelarch panels are rusted to bits and I'll probably loose the seam that seperates the bonnet and front wing panel. I'd want to get it seam welded properly of course rather than just bunging it up with filler so I can get it looking like this photo I copied off US Ebay of a rather nice racing GT6!

 With the centres painted black and the rims cut and polished I think these look absolutely great. Different and with more than a hint of drag racer style, I've almost certainly made my mind up to get some of these, paint them up and try them out on my car to see how they look! I think these are made by Alleycat because the Wolfrace ones seem to have slightly squarer holes so I'll be on the lookout on ebay as soon as I get back to the UK!
I need to get my bonnet sorted because the inner wheelarch panels are rusted to bits and I'll probably loose the seam that seperates the bonnet and front wing panel. I'd want to get it seam welded properly of course rather than just bunging it up with filler so I can get it looking like this photo I copied off US Ebay of a rather nice racing GT6!
I've also been thinking about what wheels to go for. On the Spitfire the choice basically comes down to mililite style wheels, Revolutions, wider Dunlop steels or 'slot mag' type wheels. Minilite style wheels very in quality and in my opinion the only decent looking brands are Minilite, Superlite and the Compomotive ML's. Trouble is though the minilite style wheel has been done to death on just about every classic car ever made and I want a different look for mine!
So that leaves a choice between 5.5J Dunlops steels, Revolutions and Wolfrace slot mags. I like the 4 spoke Revolutions on GT6's and I think they look good on early Spitfires but I dont think they suit the later Spitfires very well. They look a bit too open for my tastes whilst the 5 spoke versions are super rare and almost certainly out of my price bracket even if I could find some!
Dunlop 5.5J's are nice and wide but they look pretty much the same and I really fancy a change. So that leaves just 'slot mags' which I always thought looked cheesy on Triumphs, but that was until I saw this photo on the Club Triumph messageboard!
With the centres painted black and the rims cut and polished I think these look absolutely great. Different and with more than a hint of drag racer style, I've almost certainly made my mind up to get some of these, paint them up and try them out on my car to see how they look! I think these are made by Alleycat because the Wolfrace ones seem to have slightly squarer holes so I'll be on the lookout on ebay as soon as I get back to the UK!Tuesday, June 26, 2007
Gone till November!
Yes thats right there will be no more updates on this blog for a while I'm afraid! The primary reason being that I'm on the other side of the world training to be an Airline Pilot! I'm based in Hamilton, New Zealand and currently doing my PPL flying having passed all the written exams!


I've just started work on my ATPL (Airline Transport Pilot Licence) exams and should be back in the UK in November to take the exams at Gatwick. In the mean time here are a few pics of one of the aircraft I'm flying. Its an Alpha 160A and it makes 160HP from an unbelievably unstressed 8 litre engine at 2700RPM! It cruises at 127KTS which is just shy of 150MPH!
Monday, April 16, 2007
Brake Lines
I've been cracking on with the Spitfire a lot recently and I'm not doing too badly! The new master cylinders (both from Wilwood) are in and new braided brake and clutch hoses are made up and fitted.
Fitting braided hoses between the clutch slave and master is a good idea because there is a lot of vibration between their mounting points. Its no better than normal brake pipe between the brake master and the union but it looks cool and can be removed more easily! It certainly isn't any worse!
Anyway, in order to do this to your own car all you need to do is follow these easy steps!

Fitting braided hoses between the clutch slave and master is a good idea because there is a lot of vibration between their mounting points. Its no better than normal brake pipe between the brake master and the union but it looks cool and can be removed more easily! It certainly isn't any worse!
Anyway, in order to do this to your own car all you need to do is follow these easy steps!
- Get hold of about 3 metres of Euroquip brake hose (Rally Design part number EURO600) and four 3/8 x 24 UNF convex brake hose ends (Rally Design part number RD1500). If you've got Wilwood masters then you need to get two of those and two of part number RD1504 and use them with the supplied adaptors.
- What you then do is measure the hose out and cut it at the correct length. I used a junior hacksaw with a fine blade for cutting and it was pretty straightforward. A good tip is to wrap the hose in tape and cut through it to keep the braid from fraying everywhere.
- Now take apart the end connectors. You will have three peices - the bit that screws into the union, a brass olive and female threaded finisher that attaches it all together.
- Push the finisher onto the hose (you'll kick yourself if you forget this stage when it's the second connector you're attaching!)
- Now you're aiming to gently ease back the braiding around the end of the hose just enough to persuade the olive to go on the hose. I found this was relatively easy if you grab the end of the hose with the olive on and push it hard into the workbench. Make sure the olive is on the end of the hose as far as it can go!
- Now insert the hose onto the back of the threaded peice and make sure its pushed on firmly.
- Now pull the finisher down the hose and use it to lock it all together. Shouldn't need to be mega stupidly tight but it does need to crush the olive and keep it all locked together.
- Repeat as many times as needed.
- Check for leaks!
So there we have it - quite an easy and satisfying job. Just watch for the sharp ends of the braid cutting your fingers up as they can be really sharp.
Other jobs I've done include refitting the front quater valance I removed and resprayed earlier along with it's light unit and stripping out most of the interior to get at the clutch slave cylinder which I now need to bleed. The brakes are now done apart from the master cylinder reservoir. I have bought a used girling cylinder from Ebay and will use the reservoir from that - an idea I got from Club Triumph forum user '2 litre e'!
Monday, March 26, 2007
Late Braking News!
I've not been doing much on the car recently due to work, illness and the fact that I've been busy preparing to go to New Zealand to learn to fly planes in May! I'm frantically trying to get the car sorted so that I can at least have a few drives in it before I go off.
I have finally finished prepping the area and painting it and have now fitted the clutch pedal. I will do the brake pedal when I have suceeded in finding the pivot pin! I also need to cut down the piston pin on the Wilwood clutch master cylinder and fit the clevis pin through the pedal. I am currently waiting for payday so that I can buy a matching brake master cylinder and set them up together so the pedals are in the normal positions.
I have finally finished prepping the area and painting it and have now fitted the clutch pedal. I will do the brake pedal when I have suceeded in finding the pivot pin! I also need to cut down the piston pin on the Wilwood clutch master cylinder and fit the clevis pin through the pedal. I am currently waiting for payday so that I can buy a matching brake master cylinder and set them up together so the pedals are in the normal positions.

This is how it's looking so far. The paint looks much nicer in this picture than it does in real life! All that remains to do now is to strap the wiper motor back down, reconnect the choke cable and the accelerator cable and to sort out some stainless braided lines for the brake and clutch!
Tuesday, February 27, 2007
Bushes
I finally got hold of some pedal bushes from 'jimslittleshop' on ebay. These arrived this morning and I fitted them with a carefull series of blows from a large hammer. I protected the bushes with a block of wood so as not to damage them. The pedals were now looking pretty good!

So then I cleaned up a rusty pivot pin and made sure it was good to go. All that remained to do then was to fit it up in the bracket and bang it through with plenty of oil. Once it was through I locked it with some new E rings I bought last time I went to Canleys. I'm still trying to get hold of the brake pivot pin but the clutch assembly is done now!

I also invested some time ripping out some rear speakers that a previous owner had put in the rear cockpit board. These were fixed in with a ridiculous amount of plastic spacers which (together with speakers) weighed the best part of 2kg. I'm not looking to rid my car of speakers forever but I am planning to fit smaller and more discreete ones under the dash somehow. The ones I removed are actually reference quality Infinity speakers so somebody has obviously spent a fair bit of cash on them. I'm hoping to sell them and replace the rear panel with a carefully cut sheet of aluminium. I might even go as far as sealing it like the firewall of a race car!
Speaking of firewalls...I'm still getting on with spraying the bulkhead round the master cylinders but I'm not so tempted to go out in the garage while the weather's still this cold!

Thursday, February 22, 2007
New Master Cylinder
I've been pretty busy since my last post! Firstly I took all my drilled out brackets and a whole lot of other stuff to Lap-Tab in Birmingam and told them to sandblast and powdercoat them. They said it'd take a week but gave me a call a few days later and it was all done!


The credit card also took a beating this week at the online shop of Rally Design. I need new master cylinders for both the brakes and the clutch systems as the old ones were worn out. Thinking they'd be available relatively cheaply I checked at all the major suppliers and couldn't find one cheaper than about £60. I then heard of a company that can resleeve the inside of the cylinder (Past Parts) so I emailed them for a quote thinking this might be the cheapest way to sort it out. How wrong I was! The quote was exactly the same as a new cylinder!
So that left only one option really and that was to buy a Wilwood master cylinder from Rally Design. As this is only £30 it's both a cost and spec improvement over the standard stuff - which is a nice change from normal! I wasn't impressed by the postage charges on their website though - I don't think a flat rate of £8.50 is very good to be honest but they did get it sent out quickly.
I went for the Wilwood integrated reservoir cylinder and I will use it for my clutch as the capacity is pretty small and I would like a bit more 'in reserve' for my brakes. Club Triumph forum user '2litre-e' has a nice looking Wilwood cylinder with an external reservoir so I have posted on the forum inquiring about that!
Friday, February 16, 2007
Finally finished drilling!
I've finally finished all the boring drilling. I've now lost weight from the front grille, grille bracket, battery clamp and both the small and large valance brackets. The last three of these I finished today. I rushed off to the podercoaters to get them sorted this afternoon but when I got there I found they'd all gone home at 12.30! At least there's no more drilling to do!

Thursday, February 15, 2007
Lightening Fast!
I had a bit of a rush job on today. I went to Canley Classics this morning to pick up some stuff I needed for the master cylinders. I bought a complete set of mounting bolts, washers and shakeproof washers along with master cylinder gaiters, pivot pins, clips and the pedal pivot E rings. After that I went on to KD Triumph to drop off some wheel embelishers for a mate of Karls that got in touch via the Club Triumph forums. I am clearing my garage out at the moment and have more stuff to give away including a Spitfire 1500 radiator which is available free to anyone who can collect it. It's not the uprated wide type but it works 100%! Get in touch if you want it!
I was also intending to take the master cylinder brackets (and a whole lot of other stuff) into Lap Tab in Birmingham to get them powdercoated. I decided to do it tomorrow instead and spent the evening lightening up a few more bits and peices so they can go off and get coated. Shown below is the brackets that hold the front quater valences on. They are now 20g lighter!

I'm now just left with the smaller quater valance brackets and the battery retaining clamp to drill and then I can relax!
I was also intending to take the master cylinder brackets (and a whole lot of other stuff) into Lap Tab in Birmingham to get them powdercoated. I decided to do it tomorrow instead and spent the evening lightening up a few more bits and peices so they can go off and get coated. Shown below is the brackets that hold the front quater valences on. They are now 20g lighter!
I'm now just left with the smaller quater valance brackets and the battery retaining clamp to drill and then I can relax!
Subscribe to:
Posts (Atom)