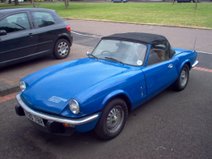
Showing posts with label Club Triumph. Show all posts

Sunday, November 22, 2009

Are You Sitting Comfortably?

That's the question I was asking myself. The answer was a resounding 'no'! One of the things I learnt from the Historic Counties Run was that the passenger seat is infinitely more comfortable than the drivers seat! Hardly surprising really - Collapsed foam and ripped vinyl crudely 'retrimmed' in gaffer tape are not the last word in comfort!


I have entered the Club Triumph Round Britain Reliability Run next year and I really wanted to get the seats sorted before then so I got started! My initial thought was to get another set of seats in better condition and swap the drivers side seat base with my knackered one. Taking a closer look at my seats quickly changed my mind. Even the passenger side was completely knackered. Just moving them produced copious amounts of foam breadcrumbs! Even the metal parts of the base were thin and seriously rusted.

I decided the best thing to do would be to get some more seats from eBay and use their guts! Fortunately eBay came up trumps with a set of seats (already partly dismantled!) in Derby. I set off after work on Thursday to pick them up. They guy selling them was building a Rover V8 powered Spitfire which looked like quite a piece of engineering. I had a look at the seats in it too. They were leather and very nice. I had a look at the seats he was selling and, whilst they weren't as nice as the ones he wasn't selling, they were much better condition than mine!


So now I had something to work with I set about stripping down the drivers side seat. The backrest had already been stripped down so all I had to do was strip down the seat base. I found it quite interesting how the seat is constructed. Basically there is a very basic steel seat frame. On top of this goes a steel 'basket' which is constructed in a similar way to a shopping trolley. At the bottom of the basket is a piece of 'millboard' to stop the foam sticking through the bottom of the basket. Attached to the millboard is the sensor for the seat belt warning light. This is then covered with two big lumps of foam. The vinyl then goes over the whole lot and attaches using 'hog rings' to the wire basket. To the uninitiated ' hog rings' are basically a C shaped bit of metal that pierces the vinyl and is then closed with a pair of pliers.

I stripped the seats down and started cleaning up the metal parts. I've recently invested in a new Black and Decker angle grinder (to replace my ancient Clarke model) so I set about the frame and 'basket' with the knotted wire cup brush. Once I'd cleaned them up I set about painting them with POR15. Before painting you need to go over all the parts with 'Marine Clean' to degrease them. I did this in the garden to save getting the workshop too wet! The metal then needs to be coated in 'Metal Ready'. This seems to etch the metal and leaves it covered in zinc and makes it ready for paint. I then painted it with the POR15. This is nasty stuff and I always use gloves and very cheap B&Q brushes because you can't clean this stuff off!


The seat frame just needs another painting session and it's good to go. Unfortunately the 'basket' from the donor seat has come unwelded at one of the joins so this needs to be corrected before I can paint it. My plans for the future involve new straps, new foam and LEATHER! Watch this space!

Sunday, March 01, 2009

Heater Box Issues

A while back I mentioned that I was looking for a heater box to replace the rusty one with a broken linkage that came off my car. I did eventually manage to track one down on Ebay nut when it arrived I realised it wasn't going to be as simple as just chucking it in the car!

It was advertised as a 'Mk4 and 1500' heater box so, naturally, I thought it'd be the same as the one I had. It was, however, slightly different internally, with a different resistor and motor wiring! After carefully studying the two designs I decided the best course of action would be to drill out the rivets holding the internals in the original box and remount them in the new one. In order to do this I had to cut out the different brackets in the Ebay box. This then left a couple of small holes close to each other.
Obviously it's not great having holes in a heater box, so I decided the best thing to do would be to drill them out into one big hole and fit a grommet. This seems to be working out okay so far and I'm just waiting for some POR15 to arrive so I can paint it.
I've finally got around to cutting out the passenger side engine valance. These are coming on slowly and just need a bit more fettling to fit. Then I can make some brackets for them and maybe finally get them powdercoated!


I really want some parts to arrive this week. The HCR is getting nearer and I'm still waiting on a list of parts as long as my arm. Moss said my alloy bellhousing would take two weeks and that was just over two weeks ago so hopefully that'll be arriving soon. I'm also still waiting on my alloy water pump housing. I was told at the end of Jan that it'd take a week and it's still not here!

Sunday, January 25, 2009

Looks Like I'm Going To Be Busy...

I've decided to enter the Club Triumph 'Historic Counties Run'. This year it's a coast to coast event that starts by the sea in Surrey and finishes, 14 hours later, on the Welsh coast. Apparently this will be a minimum of 400 miles. Combined with the journey down from the Midlands and the journey back it's probably going to be a minimum of 700 miles.
In order to cope with that kind of distance my car's going to need to be a bit more reliable! I've got no doubt that my car's in good enough condition to make it but I would like to fix the niggling little problems that've been really bugging me over the last few months. Unfortunatly the list of problems is not a small one!
Firstly there's the fueling. The carbs are worn which is leading to a very high idle. This is not exactly good for fuel consumption and neither is the repro fuel pump which is overpowering the valves in the carbs, letting fuel spray out under the bonnet. Obviously economy and safety are pretty important to me so it's vital to get this sorted before the run. The carbs need to see an expert and they will be going to Andrew Turner to be rebushed. The fuel pump is likely to be replaced with a pump from a TR7. Apparently these fit and don't produce too much pressure like the standard repro Spitfire pumps - the only difference is the position of the inlet and outlet. If replacing the pump dosen't work, I'll go electric and get an SU fuel pump mounted in the boot.
Secondly there's the heating. Not having a working heater or temperature gauge has been pretty annoying over winter! I started on this today. The heater valve was seized solid and no amount of penetrating oil was going to free it off! That was taken off and a replacement ordered from Rimmer Bros. A pressure washer was taken to the cooling system and I soon had the silt cleared out of the heater matrix. There was plently of it! The other problem was the temperature guage not showing the right temperature. I tested the guage by earthing the wire to the temperature sender against the block. This caused the guage to move upwards, revealing the sender to be at fault, so ordered a new one.
The third problem is the clutch. This is one I've been putting off for ages. The engine needs to come out so I can replace a weeping rear oil seal so I might as well replace the clutch while I'm there. The hydraulics are also leaking so I'll do that whilst I'm at it. I'm a bit annoyed with the hydraulics, in all honesty. The hose, slave and master cylinder are all new and it looks like the leaking has been caused by swarf from one of them damaging the master cylinder seals.
Then there's all the little problems. I need to drain and replace the diff oil, give the car a service and I need to Rain-X the windows and fit better wipers. Another thing I need to do is to adjust the headlamps properly and make sure they're able to stay on full beam for a prolonged period of time. Last time I used full beam in anger it overheated a contact and left me with no headlights on a dark country lane. Not something I want to do again!
If I've still got time I'm going to fit some AVO's and a lowering block to the rear.
One things for sure. I've got my work cut out for the next few months...

Saturday, January 03, 2009

Garage News!

If you're a regular reader of my blog you might be wondering what I've been up to lately! Sadly, as the Spitfire is concerned, the answer is not much! It has been left out on the drive in all weathers recently. I've got a new job working for the NHS and have spent most of the last month either working hard or visiting friends and family.

It has also been a victim of my garage renovation project! This started off as a quick project to paint the floor with some nice garage floor paint but soon started becoming much more involved! Cleaning the floor took ages because scrubbing off 50 years of soaked in oil and brake fluid isn't an easy task! I ended up painting the floor in sections and moving stuff around to clear the next area to clean and paint. It worked rather well and after that was completed I thought it looked pretty good. The only trouble was that it showed up exactly how bad the paint on the walls was, so I had to get the brushes and paint out again!
Moving stuff round while doing the painting made me realise that I didn't have any storage for anything whatsoever! There were loads of oversize tools lying around that were too big for my tool cabinet. To sort that out I made a tool hanging rack from a sheet of MDF that was lying about. This is fastened to the wall with screws and the MDF is just about soft enough to screw hooks into by hand.
That's about as far as I've got so far. There's still lots more to do. There's loads of wood that could do with being stored elsewhere and I'm still waiting on the rack mount storage bins that I'm going to mount on the wall for small parts storage. I've actually cleared enough space to get the car back in so I'm feeling very pleased with myself at the moment!


I was soon feeling less pleased with myself when I realised the brake pedal went completely to the floor! I suppose at least now I've got something to do in my garage!
I'd also like to hand out some thanks to the various people from Club Triumph who suggested ideas for my garage and workshop on the 'Show us yours' and 'Garage/Workshop' threads. There were loads of useful suggestions and plenty of good ideas that have or are in the process of becoming a reality!

Tuesday, November 25, 2008

More NEC Classic Car Show Pictures


Richard Hammonds Ford Mustang


KTM Crossbow

Thursday, January 24, 2008

Wheels!

I've finally got around to something I've been meaning to do for ages! After all this time I've finally joined Club Triumph! Now if I can only stay in the country long enough I can enter the RBRR or maybe even the 10CR!

I also finally got around to finishing off my slotmags. I was in a mad rush to get them done and on the car before I had to return to New Zealand. I had a morning to apply the last coats of paint, get them balanced and then finally fit them to the car! It seemed like mission impossible but I got it done just in time to take a few photos, pack my stuff and get on the plane! Of course there were a few hitches along the way. I couldn't get my hydraulic trolley jack under the front crossmember because the car's too low so I had to use a screw jack to raise it a couple of inches before I could slide the trolley jack under. I still need to polish the rims some more and I really need to get hold of some centre finishers to finish the job off but I think it looks pretty cool!


For some reason it now looks a bit higher off the ground than it did before. I rolled it backwards and forwards to let the suspension settle but it still seems to sit higher than before. I'll have to take it for a run and see how it looks after that before I decide what to do about it. I can just wind the AVO's down at the front but it looks like I may have to fit a lowering block at the rear. Thats another project for another time!

I've also recently joined Davesideways' new forum (http://www.sideways-technologies.co.uk/) and it looks to be shaping up quite nicely as good read for people who love their modified classics. I've already had a few more ideas that I will get around to another time. With me being on the other side of the world I don't think this is going to get updated too often over the next few months but I may have some news about parts I'm trying to aquire. Watch this space!