Tuesday, February 27, 2007
Bushes
Thursday, February 22, 2007
New Master Cylinder
The credit card also took a beating this week at the online shop of Rally Design. I need new master cylinders for both the brakes and the clutch systems as the old ones were worn out. Thinking they'd be available relatively cheaply I checked at all the major suppliers and couldn't find one cheaper than about £60. I then heard of a company that can resleeve the inside of the cylinder (Past Parts) so I emailed them for a quote thinking this might be the cheapest way to sort it out. How wrong I was! The quote was exactly the same as a new cylinder!
So that left only one option really and that was to buy a Wilwood master cylinder from Rally Design. As this is only £30 it's both a cost and spec improvement over the standard stuff - which is a nice change from normal! I wasn't impressed by the postage charges on their website though - I don't think a flat rate of £8.50 is very good to be honest but they did get it sent out quickly.
I went for the Wilwood integrated reservoir cylinder and I will use it for my clutch as the capacity is pretty small and I would like a bit more 'in reserve' for my brakes. Club Triumph forum user '2litre-e' has a nice looking Wilwood cylinder with an external reservoir so I have posted on the forum inquiring about that!
Friday, February 16, 2007
Finally finished drilling!
Thursday, February 15, 2007
Lightening Fast!
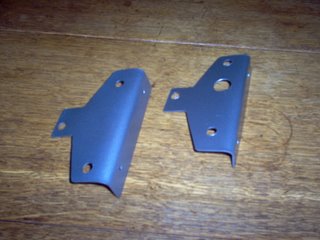
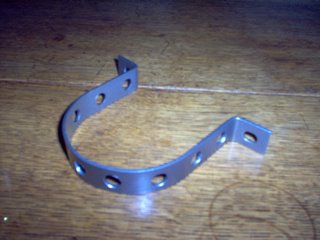
I was also intending to take the master cylinder brackets (and a whole lot of other stuff) into Lap Tab in Birmingham to get them powdercoated. I decided to do it tomorrow instead and spent the evening lightening up a few more bits and peices so they can go off and get coated. Shown below is the brackets that hold the front quater valences on. They are now 20g lighter!
I'm now just left with the smaller quater valance brackets and the battery retaining clamp to drill and then I can relax!
Tuesday, February 13, 2007
Update
Having done my best with the wire brushes, I used Hammerite Rust Remover to sort the remaining rust. I'm not particularly impressed with this slimy green mixture but it seems to work alright and is inexpensive. When its gone I will replace it with the equivalent product from Bilt Hamber Laboratories, which I have heard great things about!
I still have the area around the clutch cylinder to wire brush but I sprayed the rest with primer just to minimise exposure to the air while I finish the rest off. This is how it's looking so far...
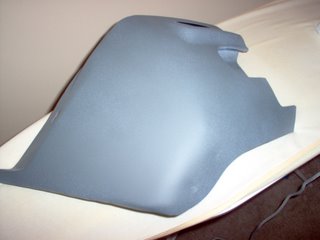
Another thing I've been getting on with is the drivers side quater valance. This now just needs flatting down and respraying before abrasive polish and then laquer can be applied. It's looking good so far but I'm not sure how close a match the colour is to the rest of the car!
Continuing the theme of modding the front of the car, I also cut the number plate horizontally so that it is the minimum size allowable by law. This means that there is only 11mm between the top of the letters and the edge of the plate. This gives a slight airflow advantage into the radiator because the area of the plate is reduced by 40 square cm. I think it looks better as well and saves 15g!
Finally, it also occured to me that I havent yet shown a picture of the T handle that I have fitted to the interior. This will eventually be used to activate a plumbed in fire extinguisher system but for the time being the cable remains curled up in the glovebox. I had initially planned to mount this in the dash but I made up a braket and mounted it just under the dash on the passenger side where the driver can reach it as well!
Sunday, February 11, 2007
More Weight Saving!
Amusingly there was also a boot light fitted on the right hand side panel that had been fitted in the past and had never worked. On removing the panel I discovered no bulb and loose wires just hanging down the back!
Thursday, February 08, 2007
Quater Valances
So, after dealing with a seized screw retaining the indicators I was left with just the metalwork. I fired up the angle grinder and stripped the paint off using a wire cup brush. For the edges and finer stuff I used a smaller wire brush in a drill. The reason for the awful cracked paint became pretty clear. It seems that the valance had been crudely painted black before getting a waxy stonechip style coat and then finally a colour coat on top. Naturally a waxy coat like that isn't the perfect base for a colour coat!
When it was in bare metal I noticed a few little knocks that needed fillering so I protected the bare metal with U-Pol Acid primer before giving a few spots a skim of filler. I then gave those areas a good wet and drying afterwards until the areas were super smooth (no perceivable ridge between filler and bare metal). I then recoated with etch primer to give 2 nice and thin coats over the area and when that had dried I smoothed it with fine wet and dry paper and gave it all 2 coats of zinc primer followed by, you guessed it, more wet and dry rubdowns! At that stage it was looking like much better! Check out the spot welds - I could have filled and smoothed them but I like them original!

So I left that to dry overnight and started on it again the next morning. First thing I did was give it a couple of thin coats of regular primer. The zinc stuff isn't very smooth and this helps to give the colour coats a smoother finish. More flatting back followed that and then I could finally get on to the colour! One coat of Tahiti Blue (from a Halfords spray can) and it was now looking like this!
More news next time!
Thursday, February 01, 2007
More Brackets!

Monday, January 29, 2007
Brackets
So I made them from 1mm steel and drilled them to fit the CD changer before bending them in a vice and spraying them with zinc primer, silver wheel paint and then lacquer. I will mount this on the panel inside the boot on the left hand side (to offset the drivers weight and as low as possible to keep the centre of gravity low!)
While I was there I also gave the wiper bracket a lick of the same paints. I know it's getting more publicity than it really deserves but here we go with a picture!
Also while I had the drill out I reduced the weight of the overengineered bracket that attaches to the chassis to the front and holds the plastic grill on. I may well drill out the horizontal parts of the grill in the future. Believe me I have a lot of time on my hands!
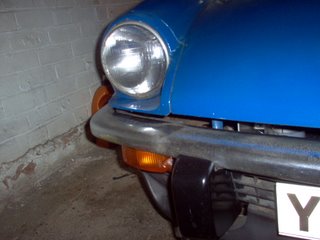
And finally a picture of the indicators. This was just a test fitting to see how they would look on the front of the car. Readers opinions are most welcome but I personally think they look great. The US light units are lighter than the standard ones, give me bigger indicators and will raise the sidelights up into the headlights. Hopefully this will mean more people will see me and should make driving it a bit safer!

Tuesday, January 23, 2007
Viva Las Vegas!
Halogen conversions with the sidelights built in are very common from all sorts of places in the UK because they are the same fitting as minis but the 'US spec' indicator is all but impossible to come by in the UK. Thats where I had a bit of help from GT6 Steve in the US, who very generously gave me a set for free and all I had to pay was the postage from Las Vegas. The postage was pretty hefty but worth it for a part that you just can't find in this country. Believe it or not I had been looking for 9 months! Quite some time for a part that I thought would be shipped over with all those 'rust free' US bodyshells and available for peanuts!
Thursday, January 11, 2007
Wiper Motor Bracket

There is also good news on the clutch pedal. I dropped it into a small garage in Caldmore where the chap it going to weld up the hole so I can redrill it. Should save me fractions of a second with every gearshift!
Friday, January 05, 2007
Clutch Pedal
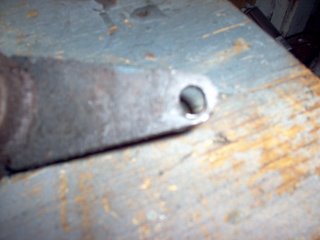
As I was cleaning up the clutch pedal I spotted that the hole near the top was worn oval by the pin that links it to the master cylinder! You can see in the photo how years of use have worn the hole out of shape. This is a setback as I now need to find someone who can weld the hole up so that I can redrill it and refit the link pin. At least it explains why the clutch pedal was so crap though!

I've also been thinking of upgrading both master cylinders rather than getting straight replacements for them as Wilwood do decent ones that are a straightforward fit and are a bit cheaper than most of the Girling ones I've seen about. This is getting expensive though and the budget is tight so we will have to see. While the cylinders are off I want to repaint the bulkhead, get the brackets powdercoated and upgrade the lines to braided hose.
This is as well as pulling the engine out and replacing the rear oil seal and the clutch and upgrading the rear engine plate to the alloy one I purchased from Davesideways. Sadly though the engine plate is lost in the post at the moment and I haven't had much luck finding an engine crane to borrow! At least the clutch I bought of ebay has shown up. Another bargain - a genuine AP clutch plate for just £6!
Saturday, December 30, 2006
Christmas Brake!
I was lacking a huge amount of clutch and brake fluid. So I topped up and had another look today and the area around the brake master cylinder is damp. The paint was flakey before and it's not going to get much better with fresh fluid pouring all over it! My plan is to rebuild (and possibly replace) both cylinders. I had previously replaced all brake and clutch parts except the clutch pipe and the master cylinders so I guess its about time! I thought I'd also take the time to repaint the bulkhead and sort out the pedals. I've finally managed to separate the 'Cross Shaft' and wasn't suprised it was so difficult to drift out - it had been put in dry and had just rusted in solid.Of course I thought I'd improve things while I'm tinkering. I plan to replace the clutch pipe with a braided flexable version and to paint the finished cylinders black to aid heat dissipation. I have also chucked out the worn out pedal rubbers (60g) and replaced them with griptape. This is the stuff I used on my wakeskates and it's super hardwearing, waterproof and weighs so little I couldn't measure it on the scales! Not the biggest weight saving in the world but it all adds up!

Thursday, November 30, 2006
Attention to Detail(ing)!
Detailing is the very thorough cleaning of a car and the basic stages can be broken down into steps. Firstly you need to was the car using a proper car shampoo and a sponge to get all the dirt off the paintwork. Then you need to use soapy water to wet the paintwork while you slide a clay bar over the surface to pull contaminants out of the paint surface. Then you polish and then you wax!
So I started off by giving it a clean with some proper car shampoo and a sponge. Without the encrusted mud up the sides it looked a whole lot better! I then used a Sonus (medium) clay bar lubricated with soapy water to clean the paint until it was perfectly smooth. I then used Autoglym Super Resin Polish and overcoated it with Poorboys World Natty's Blue Paste Wax. The heavily oxidised boot and bonnet were polished using Poorboys World SSR2 which is a compound polish.
I was very impressed with the difference the clay bar and the Poorboys World products made. The bonnet and boot really do have paintwork in poor condition but the improvement was immense. The only downside to the whole process is that the thorough cleaning has highlighted a fair few bits of bodywork that need doing!
Monday, November 13, 2006
Update! (Carbs and Bodywork)
With it all refitted to the car I set about setting the carbs up. One of the most important things to get right is the same amount of air must be sucked in by each carb. In order to check that you need a carb balancer. So after trying out a Gunson Carbtuner and finding out it was absolute crap I got on eBay and bought a decent flowmeter from Eurocarb (who I can highly recommend for their excellent customer service).
So with balance set using the flow meter and mixture set using a Gunson Colourtune it was all good and sounding better than ever. Unfortunatly whilst it revs beautifully and cleanly on the drive it's a bit stuttery on the road. I haven't got around to sorting yet but I will!
I've also been sorting out an unsightly rust scab that had been lurking around on the drivers side of the windscreen frame. I was pleasantly suprised to find no deep structural rust and can happily report that the area has been rust killered and primered and the top coat is drying as I write this. It's looking better already!