Showing posts with label clutch. Show all posts

Friday, March 26, 2010

Gearbox out!

This week has been a busy one! I started the week by fitting one of those 'Stant' lever radiator caps. This is straightforward enough but, if you're thinking of fitting one, you need to get a few things right. Firstly, the pressure rating has to be right (13lbs) and, secondly, it has to fit under the bonnet! I checked this very carefully before dropping the bonnet down for the first time!

The next job was a big one! The gearbox needed to come out so I could replace the engine's rear oil seal. I won't bore you to death with the details of how I got the gearbox out but it did involve a hell of a lot of brute force, wood and jacks. Believe it or not, I did it all on my own too!

The oil leak had made one hell of a mess. The inside of the bellhousing, bottom of the gearbox and the underside of the car were absolutely caked in oil and dirt!

The standard cast iron bellhousing weighs nearly as much as a chest freezer! I bought an alloy replacement from Moss last year and started preparing it to fit. It's not the best casting I've ever seen but I think it'll do. I've painted it inside and out and I've gone for grey POR15 this time to show up any oil leaks! It's a very similar colour to my workshop floor!

The seats are looking good. I've bought another seat foam set from Owen at Park Lane Classics. I haven't had time to do any more work on them though. I'm waiting till the gearbox is out of the way and my workshop is less dirty before I start work on them again!

Sunday, January 25, 2009

Looks Like I'm Going To Be Busy...

I've decided to enter the Club Triumph 'Historic Counties Run'. This year it's a coast to coast event that starts by the sea in Surrey and finishes, 14 hours later, on the Welsh coast. Apparently this will be a minimum of 400 miles. Combined with the journey down from the Midlands and the journey back it's probably going to be a minimum of 700 miles.
In order to cope with that kind of distance my car's going to need to be a bit more reliable! I've got no doubt that my car's in good enough condition to make it but I would like to fix the niggling little problems that've been really bugging me over the last few months. Unfortunatly the list of problems is not a small one!
Firstly there's the fueling. The carbs are worn which is leading to a very high idle. This is not exactly good for fuel consumption and neither is the repro fuel pump which is overpowering the valves in the carbs, letting fuel spray out under the bonnet. Obviously economy and safety are pretty important to me so it's vital to get this sorted before the run. The carbs need to see an expert and they will be going to Andrew Turner to be rebushed. The fuel pump is likely to be replaced with a pump from a TR7. Apparently these fit and don't produce too much pressure like the standard repro Spitfire pumps - the only difference is the position of the inlet and outlet. If replacing the pump dosen't work, I'll go electric and get an SU fuel pump mounted in the boot.
Secondly there's the heating. Not having a working heater or temperature gauge has been pretty annoying over winter! I started on this today. The heater valve was seized solid and no amount of penetrating oil was going to free it off! That was taken off and a replacement ordered from Rimmer Bros. A pressure washer was taken to the cooling system and I soon had the silt cleared out of the heater matrix. There was plently of it! The other problem was the temperature guage not showing the right temperature. I tested the guage by earthing the wire to the temperature sender against the block. This caused the guage to move upwards, revealing the sender to be at fault, so ordered a new one.
The third problem is the clutch. This is one I've been putting off for ages. The engine needs to come out so I can replace a weeping rear oil seal so I might as well replace the clutch while I'm there. The hydraulics are also leaking so I'll do that whilst I'm at it. I'm a bit annoyed with the hydraulics, in all honesty. The hose, slave and master cylinder are all new and it looks like the leaking has been caused by swarf from one of them damaging the master cylinder seals.
Then there's all the little problems. I need to drain and replace the diff oil, give the car a service and I need to Rain-X the windows and fit better wipers. Another thing I need to do is to adjust the headlamps properly and make sure they're able to stay on full beam for a prolonged period of time. Last time I used full beam in anger it overheated a contact and left me with no headlights on a dark country lane. Not something I want to do again!
If I've still got time I'm going to fit some AVO's and a lowering block to the rear.
One things for sure. I've got my work cut out for the next few months...

Monday, April 16, 2007

Brake Lines

I've been cracking on with the Spitfire a lot recently and I'm not doing too badly! The new master cylinders (both from Wilwood) are in and new braided brake and clutch hoses are made up and fitted.

Fitting braided hoses between the clutch slave and master is a good idea because there is a lot of vibration between their mounting points. Its no better than normal brake pipe between the brake master and the union but it looks cool and can be removed more easily! It certainly isn't any worse!

Anyway, in order to do this to your own car all you need to do is follow these easy steps!
  1. Get hold of about 3 metres of Euroquip brake hose (Rally Design part number EURO600) and four 3/8 x 24 UNF convex brake hose ends (Rally Design part number RD1500). If you've got Wilwood masters then you need to get two of those and two of part number RD1504 and use them with the supplied adaptors.

  2. What you then do is measure the hose out and cut it at the correct length. I used a junior hacksaw with a fine blade for cutting and it was pretty straightforward. A good tip is to wrap the hose in tape and cut through it to keep the braid from fraying everywhere.

  3. Now take apart the end connectors. You will have three peices - the bit that screws into the union, a brass olive and female threaded finisher that attaches it all together.

  4. Push the finisher onto the hose (you'll kick yourself if you forget this stage when it's the second connector you're attaching!)

  5. Now you're aiming to gently ease back the braiding around the end of the hose just enough to persuade the olive to go on the hose. I found this was relatively easy if you grab the end of the hose with the olive on and push it hard into the workbench. Make sure the olive is on the end of the hose as far as it can go!

  6. Now insert the hose onto the back of the threaded peice and make sure its pushed on firmly.

  7. Now pull the finisher down the hose and use it to lock it all together. Shouldn't need to be mega stupidly tight but it does need to crush the olive and keep it all locked together.

  8. Repeat as many times as needed.

  9. Check for leaks!

So there we have it - quite an easy and satisfying job. Just watch for the sharp ends of the braid cutting your fingers up as they can be really sharp.


Other jobs I've done include refitting the front quater valance I removed and resprayed earlier along with it's light unit and stripping out most of the interior to get at the clutch slave cylinder which I now need to bleed. The brakes are now done apart from the master cylinder reservoir. I have bought a used girling cylinder from Ebay and will use the reservoir from that - an idea I got from Club Triumph forum user '2 litre e'!

Thursday, January 11, 2007

Wiper Motor Bracket

I've recently been spending a lot of time looking after my Grandma while my Grandad's been in hospital so I've spent the time making the best use of Grandads workshop. Inkeeping with my lightweight theme (and whilst I had it off to strip the bulkhead) I whizzed up this lightweight wiper motor strap (15g). Okay so it only saves a few grammes but it looks pretty neat!

There is also good news on the clutch pedal. I dropped it into a small garage in Caldmore where the chap it going to weld up the hole so I can redrill it. Should save me fractions of a second with every gearshift!

Friday, January 05, 2007

Clutch Pedal

Trouble always seems to come in threes and my Spitfire is no exception! I pulled back the rubber gaiter on the clutch master cylinder and was greeted by the unmistakable slimy feel of brake fluid. It seems the clutch cylinder had been leaking as badly (if not worse) than the brake cylinder. All this leaking fluid had stripped the paint off the bulkhead and the clutch pedal, which now needs repainting.

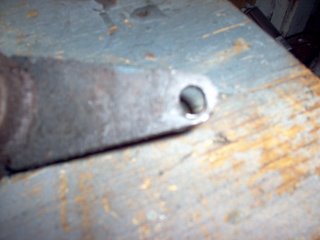
As I was cleaning up the clutch pedal I spotted that the hole near the top was worn oval by the pin that links it to the master cylinder! You can see in the photo how years of use have worn the hole out of shape. This is a setback as I now need to find someone who can weld the hole up so that I can redrill it and refit the link pin. At least it explains why the clutch pedal was so crap though!


I've also been thinking of upgrading both master cylinders rather than getting straight replacements for them as Wilwood do decent ones that are a straightforward fit and are a bit cheaper than most of the Girling ones I've seen about. This is getting expensive though and the budget is tight so we will have to see. While the cylinders are off I want to repaint the bulkhead, get the brackets powdercoated and upgrade the lines to braided hose.

This is as well as pulling the engine out and replacing the rear oil seal and the clutch and upgrading the rear engine plate to the alloy one I purchased from Davesideways. Sadly though the engine plate is lost in the post at the moment and I haven't had much luck finding an engine crane to borrow! At least the clutch I bought of ebay has shown up. Another bargain - a genuine AP clutch plate for just £6!

Friday, July 11, 2003

More clutch problems!

So having rebuilt the clutch slave cylinder I thought my clutch worries were over but, of course, there was lots more to fix! The change into third was still dodgy and it seemed to be far too easy to grate the gears. I figured the slop in the gearleaver might be causing the dodgy change so I ordered the 'Gearbox rebushing kit' from Canley Classics. Unfortunatly when it arrived I discovered it was for the earlier 3 rail gearbox! It was promptly auctioned off on Ebay where I made a significant profit on it! Later on in the week I realised the problem was with the pivot pin that fits on one side of the release arm assembly. Apparently this is a common problem and it is highlighted in the Canley Classics catalogue. With that drifted into place and the E ring attached it was sorted and the car was finally decent to drive!