Tuesday, November 25, 2008

More NEC Classic Car Show Pictures


Richard Hammonds Ford Mustang


KTM Crossbow

Saturday, November 22, 2008

Little Jobs

The car's been working pretty decently for the last few weeks and it's given me enough time to concentrate on some of the little jobs that have needed doing for a while!

The first job was to sort out the plastic rear windows. These had suffered from careless hood folding in the past and the effects of being left out in all weathers! I heard a rumour that 'Renovo' was the best thing to use so I bought some of ebay and gave it a go. It got a lot of dirt off and removed a lot of scratches. It also easily removed the sticky remnants of a sticker that had been in the back window. There is a patch that is cloudy and slightly crazed that it couldn't sort out, but other than that the improvement has been remarkable and it makes it much easier to see the car behind in the centre mirror.

The next job was to sort out the boot stay which was getting a bit stiff. This came out and after a clean up and regrease it was working smoothly. I also couldn't resist lightening it up a bit. According to the kitchen scales I've saved around 20g, which is better than nothing I suppose!


My next job is to sort out the boot! The piece of trim that goes over the petrol tank has been remade by a previous owner in some type of hardboard which was ill fitting and has curled up, presumably after getting damp. This really needs to be replaced and then I can mount my CD changer on it with the brackets I made ages ago. Then maybe my CD's wont skip annoyingly all the time!


That's about it really! The car's been faultless for weeks now and I honestly can't remember the last time I opened the bonnet!

Saturday, November 15, 2008

NEC Classic Car Show

I’ve just got back from the Classic Car Show at the NEC. This is one of the biggest shows in the calendar and this was the first time I’d ever been. Initially I was pretty apprehensive about going. For a start it was going to be expensive for two of us (£17 each plus £8 parking) and, with Top Gear on as well, the traffic was going to be terrible. After spending a little bit too long queuing on the M42, parking and walking to the exhibition halls we started looking around.

First thing that hit me was the sheer size of this show! This is a huge show. There were four halls worth of cars, traders, tools and general stuff! I thought the best place to start would be the first hall so I headed down there and took a look around. There were plenty of nice cars and plenty of Triumphs! All the Triumph clubs were in the first hall and there were plenty of fine examples on their stands. Club Triumph, the TSSC, the TR Register, Stag Owners Club and the Dolomite Club were all in attendance. The CT stand had a particularly polished example of a Spitfire 1500 on show along with a Spit 6 with Emerald EFI, a saloon and a Herald estate. There was a very interesting exhibit on the TR Register stand. They had a shell in ‘pre restored’ condition. It was held together by mole grips!


This (above) was a particularly interesting Peugeot special. The name of it loosely translated as 'hold on'! It was built along the lines of British specials with a sports body dropped on top of saloon running gear. It was very cool!


There were plenty of interesting cars from other marques too. The Meguiars stand was particularly good. There were also plenty of nice Mercedes. One I noticed had an original Becker Mexico radio which is probably worth a good proportion of what my entire car’s worth! I’m a big fan of American muscle cars and drag racing cars and there were plenty in the form of Chevy Camaros and Ford Mustangs along with various other hot rods, gassers and other drag racing stuff. I'm also a huge fan of vintage cars and Austin 7's in particular. My grandad built a special in the 60's and there were an interesting couple of specials on the Midland Austin 7 Club stand.


The ticket also got us into the MPH show hall next door. This had loads of modern cars and the Autoglym concours. There was a Napier Railton (picture below), a Ford Mustang belonging to Richard Hammond and a stunning AC Cobra entered in the concours along with a Fiat 500! The rest of the hall had the usual Lamborghinis, Ferraris and Porches. There was even a Gemballa tuned Porsche Cayenne that was finished in satin black.
There were also various cars that had been in the Gumball 3000 this year. Each were stickered up with a numerically challenged decal announcing ‘1999 to 2008 - Ten Years of the Gumball Rally’! Another car that caught my eye was the KTM Crossbow. This is a very different looking in reality compared to the pictures I’ve seen in magazines. It’s absolutely wild!

These are the pictures my mum took. I took my brothers camera and unfortunately don't have the data cable until he comes home next week so stay tuned for more pictures at a later date...

Thursday, November 13, 2008

Fly Off Handbrake Conversion

One of the things I've been wanting to do for a while now is to fit a 'fly off' type handbrake. Obviously, there's nothing wrong with the standard arrangement, it's just that I prefer the way the 'fly off' type works.

So I started off by looking at the options. Early Spitfires came with this type of handbrake as standard, so I could get one of those or I could modify the one I had. I took a look at http://asciimation.co.nz/pics/flyaway/ which illustrates how to convert an MG handbrake. In theory it's relatively straightforward to convert from one system to the other. The only difference is that on a normal handbrake the rod with the button attached connects above the pivot point on the pawl whilst on a 'fly off' it attaches below the pivot point.

With this in mind I took off the old handbrake to see if it would be possible to convert it. Unfortunately the Spitfire 1500 uses a linkage where the rod arrangement hooks around the pawl at the top and there isn't any way to change it.

With that in mind I set about looking for an early Spitfire handbrake. These seem to be impossible to get from my normal parts suppliers but Ebay turned up a nice but chronically overpriced example. With time of the essence I just spent the cash! A couple of days later I my neighbour came round with a package and I could finally see if it would fit!

At first glance it looked almost exactly the same as the Spitfire 1500 arrangement, the only difference being that the grip part on the 1500 goes up at a slight angle whilst the early one is straight. I thought I might be lucky enough to be able to do a straight swap but it was not to be! With the cable fitted nicely and everything else looking okay I realised that I couldn't seem to refit the pivot pin. I realised the problem was the ratchet part of the mechanism not being in quite the right position so I tried moving it about with a screwdriver and various other things with no luck. It then dawned on me that something was obviously wrong and it might not be possible to get the hole in the ratchet and the holes in the handbrake to align.

With this in mind I tried fitting just the ratchet on the pivot pin. It wasn't possible and I realised that something wasn't quite right! Comparing the two ratchet mechanisms showed up the problem.
Bizarrely, despite the fact that the two set ups are otherwise completely compatible, the hook part at the bottom on the older mechanism (on the left) is about 2mm longer than the same part of the newer mechanism (on the right). This ever so slight difference meant that the hole wouldn't line up right. After a few minutes with the Dremel I ground back the hook part to the same profile as the Spitfire 1500 one.

With that done, the rest of the assembly was straightforward with the only other slight problem being the pivot pin. On the Spitfire 1500 the pivot pin has a recess around it but, oddly, is retained by a clip that passes through a hole drilled close to the end. Sadly, the hole was drilled so close to the end that it had started to 'pull out', rendering it pretty much useless. Interestingly the older pivot pin was not drilled for a clip but still had the recess. An 'E clip' from my collection fitted securely and, apart from refitting the interior, the job was done.

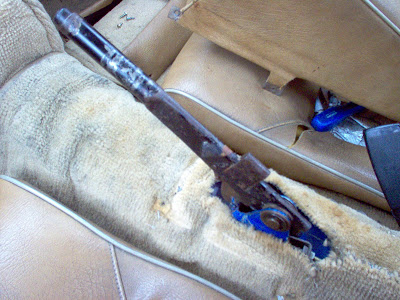
I gave it a try and discovered something was not quite right. The pawl didn't seem to want to pull away from the ratchet. I greased up the mechanism but it made very little difference. It was then of course that I worked out that the handbrake didn't have a spring in it! Luckily for me the 1500 spring is a perfect fit!

There we go. With the interior back in it looks pretty good. I just need to make my mind up about what type of grip I want to fit and it'll be perfect! At the moment I'm torn between going for the early style grip, which looks more comfy, or the later style, which would keep my car looking standard. Maybe there's another car that has a grip that's even better? I'll keep my eyes out for something suitable!

Sunday, October 12, 2008

MOT Passed at long last!

Finally I've got an MOT! There were a few hitches of course. Like I said in my last blog entry, the wipers weren't working so it failed on those. Sadly, it also had a very small hole in one of the chassis outriggers which needed welding up.

I took the car back and sorted out the wipers. It turned out to be an earth strap that I hadn't reattached after I repainted the bulkhead and was easily sorted. It's missing on the photo below but it should run from where the loom passes through the bulkhead and attaches to one of the wiper strap bolts. With that sorted I took the car back to the garage and demonstrated the wipers. They were happy and I finally got my MOT.


I sorted out insurance and tax as well. I managed to get fully comprehensive cover with Peter James for just £90! This has been quite a revalation for me. Previously I've been too young to qualify for classic car insurance and I had been paying around £500. Now I'm over 25 it looks like I'm in for cheaper times!
Taxing was straightforward as well. I did it online and, after a couple of days, I had the disc through the post. It was on my windscreen in minutes, the hood was down and I was terrorising the local A roads! So far everything seems to be running pretty nicely but, as expected, a few little gremlins have reared their ugly heads!
The first problem is leaks from both master cylinders. I'm not sure exactly what's up with the clutch master. I rebuilt it days ago and the bore and seal looked fine. Now it's leaking fluid from behind the seal and the fluid that's dripping out is silvery and metallic. I'm not exactly sure what that means but I'm going to look into it. The brake master was surrounded by a whole lot of fluid but the lid was loose and I think the fluid sloshed out. It seems to be alright now but I'll be keeping an eye on it until I'm certain it's okay.
The other problem has been a ludicrously high idle. This is a problem it's had for a while and while investigating it's causes I noticed there is a bit of play in the throttle spindles. Looks like it's time to shell out and have the carb bodies rebushed. Sounds like it's going to be expensive!
I thought to finish I'd publish a few pictures of my newly sorted footwell light. It was loose and tucked up under the dash when I bought the car and I'd been meaning to fix it for ages but I didn't know exactly where it fitted. A friendly guy on the triumphspitfire.com board helped me out with a few photos and I finally got it fitted. Interestingly someone asked the exact same question on the Club Triumph noticeboard and I was able to pass on the knowledge. I love the friendly nature of the triumph scene!


Friday, October 03, 2008

MOT Time!

As I sit writing this my car is in for the dreaded MOT at Silver Knight garage in Walsall! Everything was going well earlier in the week. I noticed what I thought was a few drops of fluid from the clutch master cylinder but, after wiping it up, I just couldn't make it leak again so I put it down to careless filling. I'd tested the lights and started the car every day and it seemed to be running beautifully so I wasn't too worried about the MOT.

Unfortunately yesterday I noticed the leak had returned! So, despite the showery weather, I took off the master cylinder, rebuilt it, repainted the bit of the bulkhead underneath it, took the gearbox tunnel out and bled the system. Of course this was a pretty major undertaking but I managed to get it all done and back together before it got dark!

I've never really been happy with the feel of my clutch. It'd always felt a bit spongey no matter how often it was bled. This time I bled it by taking off the slave cylinder and pressing the clutch down repeatedly until it was at the end of it's travel. I've got an almost new slave by the way - I wouldn't recommend trying this with an old one as the bore is likely to be corroded and to damage the seal.

With the slave effectively locked in position I could feel exactly how compressible the pedal felt. It was pretty much solid so I decided that was properly bled. I pushed the slave piston back into its bore and pressed the clutch again and everything looked good! A few tweaks at the master cylinder and I had both brake and clutch pedals at the same height and I was ready to go and get that MOT.

Of course on the way to the test station I tried to clear the windscreen and realised the wipers weren't working...

Good luck to all those drivers taking part in the Club Triumph Round Britain Reliability Run!

Saturday, September 27, 2008

Classics In The Park

I only remembered these the other day. They've been hidden on my mums memory card for a few months. Just some shots taken at 'Classics in the Park' in Litchfield earlier on in the year.

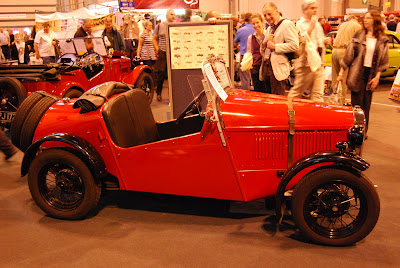
I was chatting to the guy that owned this very nicely restored TR for quite a while about the merits of upgraded started motors. That's something to look into in the future!


Everyone loves an Austin Healey and this was an especially nice one.

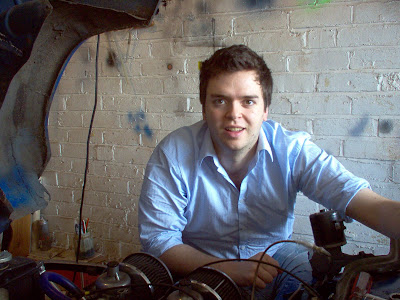
I'm not usually a huge fan of minis but my brother (standing to the right of me on the photo) loves them. The colour, rollcage and engine mods made this one look very cool.

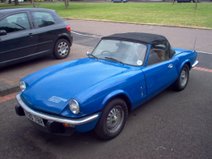
This very original looking late Spitfire 1500 caught my eye.

Unfortunately after taking these few shots the skies opened and we had to sprint back to my mums car, which was parked on the other side of the park! We would have gone back for another look but unfortunately we didn't have time because we had to be elsewhere. Ah well, there's always next year!

Thursday, September 25, 2008

Electrical Madness!

I've spent an interesting day chasing down a variety of electrical maladies. The fun started with hooking up the wiring to my new headlights. I'd taken all the old stuff off without labelling anything so it was always going to be fun!

I started by checking the continuity and identifying the cables with the multimeter. Everything was pretty straightforward and I soon had the dipped and full beam working. Wiring in the sidelights was interesting because they have to hook up to part of the loom that isn't attached to the bonnet. I connected it up to make sure it worked but there was a bit of a birds nest so I'll have to come up with something better in the next few days.

The indicators were a good laugh. The left hand side one worked perfectly but I spent hours 'having fun' with the right hand side! Firstly, it failed the continuity test on the multimeter. I opened it up and found out why. I'd fitted the indicator unit without putting a bulb in it!

I had a rustle about in the garage and found another bulb and fitted it. It fitted in the socket perfectly but for some reason still wouldn't light up. That reason turned out to be because the American indicator unit was designed for a twin fillament bulb and I'd fitted a single. With that sorted the damn thing still wouldn't light up! It turned out to be a dodgy joint and I eventually got it sorted with a bit of sandpaper and copper grease.

That wasn't the end of my electrical issues though. With the hazards on, I noticed one of the rear indicators wasn't flashing. Fortunatly this was another dodgy connection - it turned out to be a spade terminal that'd come adrift and was a three second job to fix.

With the hazard lights flashing beautifully on demand I set about finding out why my indicators wouldn't work in twos. Another adrift spade terminal was the cause, this time on the flasher relay. I finally had working indicators!

I finished up my electrical marathon by 'spira wrapping' the loom to keep it tidy and by sorting out a minor problem with the horn. I couldn't find anything wrong with it but after removing and refitting the horn push I was back in business. Sorted!

Friday, September 19, 2008

Bleeding Brakes!

I've been having a bit of a lull in activity on the Spitfire recently. Over the last month or so I haven't felt like looking at it or doing any of the niggling little jobs that would get it back on the road. Recently I haven't even had much time even for talking about triumphs on the Internet. I just basically didn't even want to think about it.

I think everyone with a Triumph goes through phases like this. Eventually, and often for no good reason, you seem to just get some renewed enthusiasm and you get back into it!

With yesterday being a nice sunny day my mood improved and I finally got the bug again. I started off by bleeding the brakes. The car is out on the drive and that's got a slight slope on it so I had to chock the wheels before I jacked up the back end and popped under some axle stands. With the wheels off and a bit of help from my mum to press the pedal it was all done pretty quickly. I did have a 'one way' valve type bleeding kit but I never found it very good. When I dug it out for this job the piping had misted up from corrosiveness of the brake fluid. That's a bit of a design flaw! So instead I did it the old school way, with a piece of hose and an assistant. Seems to have worked okay and the pedal seems pretty firm.

I was slightly annoyed to find some paint peeling around the nearly new master cylinder for the clutch. I'm still looking into it but it does seem like it's coming from the main seal around the piston. Watch this space!

Another problem I've been having is with fuel overflowing out of the float chambers. I've got a repro fuel pump and it's a well known problem that they produce too much fuel pressure. In an attempt to sort it I've fitted a regulator, filters and new needle jets. It doesn't seem to work too badly at the moment but I'd rather not have to have the regulator. I'm currently looking into using a TR7 fuel pump, something a member of the CT forum suggested. Hopefully then I can get this thing back on the road!

Sunday, June 22, 2008

Running Again!

I've been working on the car pretty much non stop now for the last couple of days! I've got lots of minor things done and finally got around to starting it up for the first time in about 15 months.

The first major job I completed was the installation of the headlights. These are not yet wired up but they are fitted. It was a fairly simple procedure that just involved mounting up the plastic nests, fitting the lamp units and refitting the headlamp cowls.

These are the cowls as they came from SVC. The little metal tags you can see around the rims hold the light units in place - a completely different system from the standard fitting where the lamps are held in place with a spring.


Weirdly they mount up asymmetrically with the adjusters on both headlights on the same side. I'm not sure if the standard ones were like that but it sure had me confused trying to fit them!

Another job I finally got round to is sorting out some of the paintwork on the bonnet. I've never been happy with the heavily oxidised paint and have tried using all manner of polishes and compounds to sort it out. None of them have worked so I resorted to more extreme methods! I decided that what was needed was to refinish the paint by flatting it back. Actually 'refinish' might not be the right word to use at all. The spots and runs on various parts of the car lead me to believe it might not have been properly 'finished' from the start. Either way after a session on the bonnet with 1500 grade wet and dry and plenty of soapy water I now have a lot less oxidisation. Of course now I have to remove the scratches that the wet and dry left and I've ordered some Poorboys SSR3 which should do the trick nicely!

I've also finally got around to starting it up! I unscrewed the dampers in the dashpots and put a little oil down the bores before cranking it over to get oil pressure. Then she rumbled into life! All I had to do was turn the fuel pressure down a tad to stop a float chamber overflowing and I was back in business. Result!

Thursday, June 19, 2008

Quarter Valance Done!

Yes, I've finally finished it! When I last mentioned it I was putting colour coats on it but since then I've given it a coat of 'leveller', cut the paint back and lacquered it. The 'leveller' is good stuff. It basically 're-activates' the paint and leaves the surface smoother so you don't get the 'orange peel' effect that spraying with a can often gives. After the lacquer I gave it a good cutting back with Poorboys SSR2 followed by Meguires 'Paint Cleaner', Autoglym 'Super Resin Polish' and finally Poorboys 'Nattys Blue' wax. After all that I had a finished panel and a knackered arm!

So then all I had to do was fit the indicator unit and mount it all up in the car. Nothing special about fitting the indicators, they just go straight in. I use a little bit of electrical tape around the edges of the panel where the squire clips fit just to prevent them scratching and becoming a rust trap.


So then all that I needed to do was to fit it to the car! If you want to fit one of these without removing the spoiler or bumper then the best way to do it is to open the bonnet and drop it in from behind. Then do up the bolts and you're done. I think it looks pretty cool now!

I've just had a delivery from the royal mail and it looks like my afternoon is sorted! I ordered some brake unions from Merlin Motorsport yesterday and they've arrived today along with the light 'nests' and wiring from SVC. I've just had a quick look at the wiring and they look perfect. Just got to fit them now!

Tuesday, June 17, 2008

Let There Be Lights!

Okay so I haven't actually fitted them and got working lights but at least I have some now! They came this morning and I've had a look at them and they look pretty good. Interestingly the sidelights are below and offset to the right of the main bulbs. I guess this is so that they are pointing through the correct part of the reflector. Annoyingly, the sidelight bulb holders come with about 4 inches of wire attached to them. The instructions say that you need to solder the connectors (supplied) onto them and then plug it into the car. Why is that annoying? Well I'm guessing 99.9% of people who buy these are going to need to solder those on. Why couldn't they do it at the factory? Why should I have to finish them off!?


Anyway, while I was looking at http://www.s-v-c.co.uk/ I noticed they do a pre-assembled wiring harness for these lights. So I gave them a call and got both the 'nest' and the wiring loom ordered! The guy I spoke too was very friendly, helpful and seemed to be very knowledgeable so I'm fairly confident the right parts will be winging their way to me soon! If you're thinking about doing this conversion them I recommend you factor in the prices for all these little extras. You can't actually fit the Halogen conversion light units with the old back parts so you need to get new ones. The price of these extras has nearly doubled the cost of the conversion!

I also pushed the car outside for the first time in over a year! Believe it or not the only thing stopping me pushing it before was a flat tyre! It seems these Yokohama tyres are so soft that a flat really can make the whole car nearly impossible to push! Anyway, the first thing I did with it outside was to jet wash off the dust and dirt that it had acquired over the year. I then went over it with Poorboys SSR2, Autoglym Super Resin Polish and finally finished off with Poorboys 'Nattys Blue'. Its finally starting to look a bit more respectable - just the quarter valance, brakes and headlights to finish off now!


Friday, June 13, 2008

Headlight Stripdown!

With the weather taking a turn for the worst I put the painting of the quarter valance on hold and started the daunting task of removing the old sealed beam units. I expected to uncover lots of rust and I wasn't disappointed!

First of all I needed to remove the headlamp surrounds. These are aluminium and are meant to be held on using a couple of bolts and a stud, but on mine there were only two! Unusually for my car they came off pretty easily. In fact two of them came off by hand!

With those out of the way, and with the help of a lake of penetrating oil, I finally unscrewed the chrome rings from around the light units and exposed some disintigrating inner bowls.

With those chucked in the scrap pile I only had the outer bowls left to remove. Each of these is attached to the bodywork by four rivets. I tried drilling these out but they had an annoying tendancy to spin with the drill so I changed tactics and resorted to grinding the heads off with my trusty Dremel followed by punching the remains out. This worked quite nicely and they did eventually come out, exposing more rust and some incredibly sorry looking rubber seals. This is pretty much where I've left it so far...


I've ordered a halogen conversion set from Mini Academy to replace the dismal sealed beam units. Unfortunately fitting these kind of headlights with the original back bowls would mean that I'd have to go through this entire strip down again just to replace a bulb! I hadn't realised this previously but thanks to a well timed thread on the Club Triumph noticeboard I discovered a solution. Thanks to 'phil866' who suggested the 7" open back nest set from Stafford Vehicle Components!

That's as far as I've got with the lights so far, but I have spent a little time fitting the alloy alternator mount that I bought from Canley Classics about 6 months ago. There was very little drama to report fitting it other than the fact that I cut my hand on a stray piece of glass that was hanging around in the garage! Just out of interest I weighed the old iron mount (575g) and compared it to the new one (225g). That's a saving of 350g! Very nice!

Wednesday, June 11, 2008

Painting!

I've spent the day so far working continuing with the passenger side quarter valance. The etch primer coat from yesterday had dried nicely so I sprayed on the next layer which was a Halfords Zinc primer. I use Halfords paint for touching up and small jobs like this because it's a fairly decent acrylic paint and it's easy to get more of it in a hurry! There is also the advantage that they sell 'Rover Tahiti Blue' ready made in a can, so it saves a lot of hassles ordering in paint. The zinc primer leaves a fairly rough coat which is pretty good for taking the colour coat over the top.


It's definitely getting there! At this point I thought I'd better take a quick picture of the modifications needed to fit the American style indicators. As I mentioned before the body of the light is larger than the standard ones so you have to clearance the opening in the panel to get it to fit. I just used a burr in a drill for this and a Dremel to finish it off. By the time I'd finished it looked like this...


So after the primer coats I thought I'd better get some colour on there and sprayed over the panel in 'Tahiti blue'. You generally want to use paint on a warm day. I'm pretty lucky because it's a warm day today in the midlands and it's perfect for spraying outside! When spraying colour coats I tend to spray a bit closer to the panel than most and spray in lines working my way down the panel in short bursts. I make sure the paint is really 'wet' on the panel and I try to make sure my next pass meets up with the wet edge of the previous pass. This technique has worked pretty well for me in the past and it really is surprising how good a result you can get. At the moment I'm just letting it harden a bit before I continue with colour coating the other side. I will post another update soon but for the time being it's looking like this...

Tuesday, June 10, 2008

I'm Back!

Yes, I'm finally back in the UK! I'm back sooner than expected having parted ways with the company I was doing my pilot training with. I won't go into details other than to say it had been a pretty frustrating year for me as they basically struggled to get me flying and messed me about from day one. Over the year I had flown an average of less than once a week. Pretty bad considering that it's a full time residential course that doesn't have any holidays built into the schedule and you're supposed to fly 3 times a week!

Anyway, it's given me lots of energy to work on the Spitfire! I've had a good look at the parts I bought while I was abroad and I'm going to be fitting them and getting the car ready for the dreaded MOT over the next few weeks.

First thing I noticed when I stuck my head around the garage door was that the suspension has settled a fair bit since I fitted the wheels. The second thing I noticed was an oil slick! Looks to me like the sump plug is leaking a bit. I'm not quite sure what's happened there but I'll be having a look over the next few days. Another problem lies with the brake master cylinder. It's empty! I'm going to investigate and also replace the hose lines with some swivel fittings as I've never been happy with how the flexi hoses attach to the master cylinders.

I tried to push the car out of the garage and onto the drive the other day too but ran into some problems there as well. It didn't want to budge! I checked the handbrake and it wasn't on. I'd left it off deliberately to stop this sort of thing happening! Having rocked it back and forth a bit I've decided that it isn't a brake problem but it might be due to having a couple of flat tyres. I'll hopefully be sorting that soon!

I have done a few jobs already though. Firstly, I fitted my new number plate. This was a relatively easy one. I was careful to mount it at the right height and to get the holes in the right place. It worked out rather well and all I had to do was spray the plastic mounting screws black and fit it up. Looks good I think!


Then I began working on getting the lights sorted out. I'm fitting 'US spec' indicators and although it seemed like they would be a straightforward fit so far it has proven not to be the case! The back part is slightly larger than the UK part and I had to remove the quarter valances and open the holes out slightly with a Dremel to get them to fit. Of course regular readers may remember that I resprayed one of my quarter valances a while back. Unfortunately when taking the passenger side off I realised that it was just as bad (if not worse) as the drivers side had been so I reluctantly set to work on it.

I quite enjoy bodywork and I've been asked a few times how to do things like this so I might as well go through it in detail! First of all I stripped the mix of paint and Dinitrol off it using a knotted wire brush in an angle grinder and a wire brush on a drill for the tricky bits. Once the paint was off I had a good look at it and saw a few dents and dings here and there that would need a bit of filler and a few pitted areas that would need some rust killer. After cleaning off the remaining rust killer with thinners I gave it a good thin coat of Upol Acid #8 which highlighted all the bumps!


When that had dried I used a few thin smears of Isopon P38 to fill all the low points. After letting that dry I sanded it flat with a sanding pad on an electric 'delta' sander. The trick here is not to use a sanding pad which is too course or too fine. You don't want to 'polish' the filler but neither do you want to leave marks in it which might show through the paint! Also when you're sanding back don't worry about taking the paint around it off. You just need to respray it again like so.


If you think there are some more dents on the left hand side then you're wrong! Those are just the spot welds where the inner skin of this panel is attached. So now we've got a lovely dent free panel waiting for some more paint...

I think I'll carry on with this tomorrow!

Sunday, April 20, 2008

Number Plate

I've been at it again - thinking about my cars aesthetics! My latest purchase is a new number plate for the front of my Spitfire.

I've been messing around with the front of the car since I bought it! When I first got it it came with an absolutely massive plate that blocked off virtually the whole of the radiator grill. Unsurprisingly there were some cooling issues! I'm sure they were largely due to the radiator, which was standard size and looked like it had seen better days, but the huge plate didn't help!

To sort it I fitted a wide radiator and cut the edges of the plates off, leaving the minimum legal distance between letters and the edge of the plates. The cooling problems were sorted but I still wasn't happy with how it looked. There was only so much chopping down I could do with the letters as big as they were (way bigger than the legal minimum size!) and I was left with square edges on each side which looked a bit odd! Something had to be done...

I looked at various options. Stick on plates didn't do it for me. I don't like the way they look mounted almost horizontally on the bonnet. I don't like the look of plates mounted on the spoiler either so that only left me with the option of using a smaller plate in the standard location.

This is where things got a little bit err....complex. In order to get what I wanted I was going to have to bend and break a few laws. Basically, I wanted a 3/4 size plates and these aren't strictly road legal. After doing my homework and looking on a few forums I couldn't find anyone that had been pulled over for having a smaller front plate so I decided to go for it.

This led me to the next problem. Getting number plates made is supposed to involve lots of hassle with ID and proof of ownership and stuff. The way the number plate sellers get around this is by selling plates that are for 'show' only. So without all that hassle I got http://www.fancyplates.com/ to make one up for me. It looks great and arrived the next day. So for good service they get recommended by me!

Saturday, February 09, 2008

Roller Rockers

I've been busy this week looking out for parts going cheap! I'm going to have a few jobs to do on the Spitfire in the future and I really want to get all the parts aquired so I can just do it next time I've got some time off. One of these little jobs has been brought about by a steady drip of oil under the car. It can only be coming from the rear oil seal so basically either the engine or the gearbox will have to come out to fit a new one. I'm not in the business of doing anything by halves either so there will be a mass upgrading in that area while the engine is out. I'm going to go for one of those light flywheels (either a Canleys steel or a Firdanza alloy one) and an alloy bellhousing. Of course I'll chuck in the AP clutch and the alloy backplate I've already got, bolt it all back together (I've heard Chevy flywheel bolts are a good upgrade) and I should be good to go!

My other little job is to finish off my cylinder head. I still need to finish the exhaust ports off and get a pro to fit bigger valves for me. Basically the lot need doing. It need new guides, valves and springs. It's sounding more expensive by the second!

Despite saying only recenly that I would be smoothing and polishing some rockers up I had a change of plan. Ebay turned up some Harland Sharp roller rockers that were going suprisingly cheaply. A bargain for just £84! I love Ebay!


Thursday, January 24, 2008

Wheels!

I've finally got around to something I've been meaning to do for ages! After all this time I've finally joined Club Triumph! Now if I can only stay in the country long enough I can enter the RBRR or maybe even the 10CR!

I also finally got around to finishing off my slotmags. I was in a mad rush to get them done and on the car before I had to return to New Zealand. I had a morning to apply the last coats of paint, get them balanced and then finally fit them to the car! It seemed like mission impossible but I got it done just in time to take a few photos, pack my stuff and get on the plane! Of course there were a few hitches along the way. I couldn't get my hydraulic trolley jack under the front crossmember because the car's too low so I had to use a screw jack to raise it a couple of inches before I could slide the trolley jack under. I still need to polish the rims some more and I really need to get hold of some centre finishers to finish the job off but I think it looks pretty cool!


For some reason it now looks a bit higher off the ground than it did before. I rolled it backwards and forwards to let the suspension settle but it still seems to sit higher than before. I'll have to take it for a run and see how it looks after that before I decide what to do about it. I can just wind the AVO's down at the front but it looks like I may have to fit a lowering block at the rear. Thats another project for another time!

I've also recently joined Davesideways' new forum (http://www.sideways-technologies.co.uk/) and it looks to be shaping up quite nicely as good read for people who love their modified classics. I've already had a few more ideas that I will get around to another time. With me being on the other side of the world I don't think this is going to get updated too often over the next few months but I may have some news about parts I'm trying to aquire. Watch this space!

Thursday, January 10, 2008

Finally! An Update!

Okay so its been a long time coming but here's the first update in quite some time! I've been busy over christmas but not on the car sadly...

I got back from NZ on the 28th of November and since then seeing the girlfriend, christmas and pilot exams have all taken their toll on my spare time but that dosent mean I havent been busy getting a few bits sorted out for the car!
I've always said that that time and money are the two biggest factors in how I work on my car. Sometimes I've got time and no money so I lighten up some stuff or do a few little jobs and sometimes I've got more money than time and I buy some nice shiny bits! I've not had the time recently so the shiny bits have been rolling in!
Here's a few bits and bobs I've recently aquired. First off is something I've been after for a while - an alloy engine backplate. I bought one of these from Dave 'Sideways' Powell a while back but postal incompetance meant that it never arrived so I bought one from Canley Classics the other week.
Wierdly it looks smaller when it's not on the car! Looks nicely made with all the holes in the right place so it gets the thumbs up from me! Not planning to fit it at the moment so I'll probably just chuck it in the parts box untill I can fit it. I'll probably leave it till I replace the clutch and chuck in a lightweight flywheel, race clutch, alloy bellhousing etc etc.

I also thought I'd treat myself to an alloy alternator bracket (again from Canley Classics). I know its not going to save a tonne of weight but it sure does look cool!

I've also had a chance to check out the rocker spacers. I might well take the rocker shaft out and rebuild it while I'm out in NZ to give me something to do on the boring days I'm not flying! I may even take the Dremel out there and smooth and polish the rockers up!

I've also been working on the wheels I bought. It's been an epic mission to strip all the old paint off. There were about four layers and each seemed to be better applied than the last. It took a whole bottle of nitromoors to get it sorted and even then it took an epic amount of time with wire wool and wire brushes to get the final bits of paint off! I'm still finishing them off but one is painted up nicely and the result is pretty good. What do you think?

Of course I had to get some nuts to bolt them up. I will eventually upgrade the studs, but for now I bought nuts to fit the standard size studs. I got them from Speedshack and I can thoroughly recommend them. They knew exactly what they were talking about and got them delivered in double quick time so they get a recommendation from me!

I'm also trying to fit the 'all orange' indicators that 'GT6Steve' sent me from Las Vegas but I've run into a bit of a stumbling block. It seems that the fitment of them to a UK spec spit is not as straightforward as it would seem. The bulb holding back part of the light is bigger than the UK ones so it needs the hole opening up with the trusty Dremel!

And finally a request for help! Anyone know how to remove the standard type of mirrors that come come on a Spitfire? I've only got one on the drivers side and theres a screw sunk into a recess on the back of it but it dosent seem to want to move! Do I have to get at it from the inside of the door?