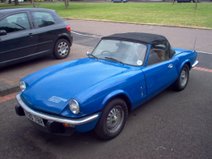
I've been having a bit of a lull in activity on the Spitfire recently. Over the last month or so I haven't felt like looking at it or doing any of the niggling little jobs that would get it back on the road. Recently I haven't even had much time even for talking about triumphs on the Internet. I just basically didn't even want to think about it.
I think everyone with a Triumph goes through phases like this. Eventually, and often for no good reason, you seem to just get some renewed enthusiasm and you get back into it!
With yesterday being a nice sunny day my mood improved and I finally got the bug again. I started off by bleeding the brakes. The car is out on the drive and that's got a slight slope on it so I had to chock the wheels before I jacked up the back end and popped under some axle stands. With the wheels off and a bit of help from my mum to press the pedal it was all done pretty quickly. I did have a 'one way' valve type bleeding kit but I never found it very good. When I dug it out for this job the piping had misted up from corrosiveness of the brake fluid. That's a bit of a design flaw! So instead I did it the old school way, with a piece of hose and an assistant. Seems to have worked okay and the pedal seems pretty firm.
I was slightly annoyed to find some paint peeling around the nearly new master cylinder for the clutch. I'm still looking into it but it does seem like it's coming from the main seal around the piston. Watch this space!
Another problem I've been having is with fuel overflowing out of the float chambers. I've got a repro fuel pump and it's a well known problem that they produce too much fuel pressure. In an attempt to sort it I've fitted a regulator, filters and new needle jets. It doesn't seem to work too badly at the moment but I'd rather not have to have the regulator. I'm currently looking into using a TR7 fuel pump, something a member of the CT forum suggested. Hopefully then I can get this thing back on the road!
Friday, September 19, 2008


Sunday, June 22, 2008
Running Again!
I've been working on the car pretty much non stop now for the last couple of days! I've got lots of minor things done and finally got around to starting it up for the first time in about 15 months.
The first major job I completed was the installation of the headlights. These are not yet wired up but they are fitted. It was a fairly simple procedure that just involved mounting up the plastic nests, fitting the lamp units and refitting the headlamp cowls.
The first major job I completed was the installation of the headlights. These are not yet wired up but they are fitted. It was a fairly simple procedure that just involved mounting up the plastic nests, fitting the lamp units and refitting the headlamp cowls.
 These are the cowls as they came from SVC. The little metal tags you can see around the rims hold the light units in place - a completely different system from the standard fitting where the lamps are held in place with a spring.

Weirdly they mount up asymmetrically with the adjusters on both headlights on the same side. I'm not sure if the standard ones were like that but it sure had me confused trying to fit them!
Another job I finally got round to is sorting out some of the paintwork on the bonnet. I've never been happy with the heavily oxidised paint and have tried using all manner of polishes and compounds to sort it out. None of them have worked so I resorted to more extreme methods! I decided that what was needed was to refinish the paint by flatting it back. Actually 'refinish' might not be the right word to use at all. The spots and runs on various parts of the car lead me to believe it might not have been properly 'finished' from the start. Either way after a session on the bonnet with 1500 grade wet and dry and plenty of soapy water I now have a lot less oxidisation. Of course now I have to remove the scratches that the wet and dry left and I've ordered some Poorboys SSR3 which should do the trick nicely!
I've also finally got around to starting it up! I unscrewed the dampers in the dashpots and put a little oil down the bores before cranking it over to get oil pressure. Then she rumbled into life! All I had to do was turn the fuel pressure down a tad to stop a float chamber overflowing and I was back in business. Result!
Thursday, June 19, 2008
Quarter Valance Done!
Yes, I've finally finished it! When I last mentioned it I was putting colour coats on it but since then I've given it a coat of 'leveller', cut the paint back and lacquered it. The 'leveller' is good stuff. It basically 're-activates' the paint and leaves the surface smoother so you don't get the 'orange peel' effect that spraying with a can often gives. After the lacquer I gave it a good cutting back with Poorboys SSR2 followed by Meguires 'Paint Cleaner', Autoglym 'Super Resin Polish' and finally Poorboys 'Nattys Blue' wax. After all that I had a finished panel and a knackered arm!


 I've just had a delivery from the royal mail and it looks like my afternoon is sorted! I ordered some brake unions from Merlin Motorsport yesterday and they've arrived today along with the light 'nests' and wiring from SVC. I've just had a quick look at the wiring and they look perfect. Just got to fit them now!
So then all I had to do was fit the indicator unit and mount it all up in the car. Nothing special about fitting the indicators, they just go straight in. I use a little bit of electrical tape around the edges of the panel where the squire clips fit just to prevent them scratching and becoming a rust trap.
So then all that I needed to do was to fit it to the car! If you want to fit one of these without removing the spoiler or bumper then the best way to do it is to open the bonnet and drop it in from behind. Then do up the bolts and you're done. I think it looks pretty cool now!
I've just had a delivery from the royal mail and it looks like my afternoon is sorted! I ordered some brake unions from Merlin Motorsport yesterday and they've arrived today along with the light 'nests' and wiring from SVC. I've just had a quick look at the wiring and they look perfect. Just got to fit them now!Tuesday, June 17, 2008
Let There Be Lights!
Okay so I haven't actually fitted them and got working lights but at least I have some now! They came this morning and I've had a look at them and they look pretty good. Interestingly the sidelights are below and offset to the right of the main bulbs. I guess this is so that they are pointing through the correct part of the reflector. Annoyingly, the sidelight bulb holders come with about 4 inches of wire attached to them. The instructions say that you need to solder the connectors (supplied) onto them and then plug it into the car. Why is that annoying? Well I'm guessing 99.9% of people who buy these are going to need to solder those on. Why couldn't they do it at the factory? Why should I have to finish them off!?


Anyway, while I was looking at http://www.s-v-c.co.uk/ I noticed they do a pre-assembled wiring harness for these lights. So I gave them a call and got both the 'nest' and the wiring loom ordered! The guy I spoke too was very friendly, helpful and seemed to be very knowledgeable so I'm fairly confident the right parts will be winging their way to me soon! If you're thinking about doing this conversion them I recommend you factor in the prices for all these little extras. You can't actually fit the Halogen conversion light units with the old back parts so you need to get new ones. The price of these extras has nearly doubled the cost of the conversion!
I also pushed the car outside for the first time in over a year! Believe it or not the only thing stopping me pushing it before was a flat tyre! It seems these Yokohama tyres are so soft that a flat really can make the whole car nearly impossible to push! Anyway, the first thing I did with it outside was to jet wash off the dust and dirt that it had acquired over the year. I then went over it with Poorboys SSR2, Autoglym Super Resin Polish and finally finished off with Poorboys 'Nattys Blue'. Its finally starting to look a bit more respectable - just the quarter valance, brakes and headlights to finish off now!
Friday, June 13, 2008
Headlight Stripdown!
With the weather taking a turn for the worst I put the painting of the quarter valance on hold and started the daunting task of removing the old sealed beam units. I expected to uncover lots of rust and I wasn't disappointed!


First of all I needed to remove the headlamp surrounds. These are aluminium and are meant to be held on using a couple of bolts and a stud, but on mine there were only two! Unusually for my car they came off pretty easily. In fact two of them came off by hand!
With those out of the way, and with the help of a lake of penetrating oil, I finally unscrewed the chrome rings from around the light units and exposed some disintigrating inner bowls.
With those chucked in the scrap pile I only had the outer bowls left to remove. Each of these is attached to the bodywork by four rivets. I tried drilling these out but they had an annoying tendancy to spin with the drill so I changed tactics and resorted to grinding the heads off with my trusty Dremel followed by punching the remains out. This worked quite nicely and they did eventually come out, exposing more rust and some incredibly sorry looking rubber seals. This is pretty much where I've left it so far...
I've ordered a halogen conversion set from Mini Academy to replace the dismal sealed beam units. Unfortunately fitting these kind of headlights with the original back bowls would mean that I'd have to go through this entire strip down again just to replace a bulb! I hadn't realised this previously but thanks to a well timed thread on the Club Triumph noticeboard I discovered a solution. Thanks to 'phil866' who suggested the 7" open back nest set from Stafford Vehicle Components!
That's as far as I've got with the lights so far, but I have spent a little time fitting the alloy alternator mount that I bought from Canley Classics about 6 months ago. There was very little drama to report fitting it other than the fact that I cut my hand on a stray piece of glass that was hanging around in the garage! Just out of interest I weighed the old iron mount (575g) and compared it to the new one (225g). That's a saving of 350g! Very nice!
Wednesday, June 11, 2008
Painting!
I've spent the day so far working continuing with the passenger side quarter valance. The etch primer coat from yesterday had dried nicely so I sprayed on the next layer which was a Halfords Zinc primer. I use Halfords paint for touching up and small jobs like this because it's a fairly decent acrylic paint and it's easy to get more of it in a hurry! There is also the advantage that they sell 'Rover Tahiti Blue' ready made in a can, so it saves a lot of hassles ordering in paint. The zinc primer leaves a fairly rough coat which is pretty good for taking the colour coat over the top.


It's definitely getting there! At this point I thought I'd better take a quick picture of the modifications needed to fit the American style indicators. As I mentioned before the body of the light is larger than the standard ones so you have to clearance the opening in the panel to get it to fit. I just used a burr in a drill for this and a Dremel to finish it off. By the time I'd finished it looked like this...
So after the primer coats I thought I'd better get some colour on there and sprayed over the panel in 'Tahiti blue'. You generally want to use paint on a warm day. I'm pretty lucky because it's a warm day today in the midlands and it's perfect for spraying outside! When spraying colour coats I tend to spray a bit closer to the panel than most and spray in lines working my way down the panel in short bursts. I make sure the paint is really 'wet' on the panel and I try to make sure my next pass meets up with the wet edge of the previous pass. This technique has worked pretty well for me in the past and it really is surprising how good a result you can get. At the moment I'm just letting it harden a bit before I continue with colour coating the other side. I will post another update soon but for the time being it's looking like this...
Tuesday, June 10, 2008
I'm Back!
Yes, I'm finally back in the UK! I'm back sooner than expected having parted ways with the company I was doing my pilot training with. I won't go into details other than to say it had been a pretty frustrating year for me as they basically struggled to get me flying and messed me about from day one. Over the year I had flown an average of less than once a week. Pretty bad considering that it's a full time residential course that doesn't have any holidays built into the schedule and you're supposed to fly 3 times a week!
Anyway, it's given me lots of energy to work on the Spitfire! I've had a good look at the parts I bought while I was abroad and I'm going to be fitting them and getting the car ready for the dreaded MOT over the next few weeks.
First thing I noticed when I stuck my head around the garage door was that the suspension has settled a fair bit since I fitted the wheels. The second thing I noticed was an oil slick! Looks to me like the sump plug is leaking a bit. I'm not quite sure what's happened there but I'll be having a look over the next few days. Another problem lies with the brake master cylinder. It's empty! I'm going to investigate and also replace the hose lines with some swivel fittings as I've never been happy with how the flexi hoses attach to the master cylinders.
I tried to push the car out of the garage and onto the drive the other day too but ran into some problems there as well. It didn't want to budge! I checked the handbrake and it wasn't on. I'd left it off deliberately to stop this sort of thing happening! Having rocked it back and forth a bit I've decided that it isn't a brake problem but it might be due to having a couple of flat tyres. I'll hopefully be sorting that soon!
I have done a few jobs already though. Firstly, I fitted my new number plate. This was a relatively easy one. I was careful to mount it at the right height and to get the holes in the right place. It worked out rather well and all I had to do was spray the plastic mounting screws black and fit it up. Looks good I think!

Then I began working on getting the lights sorted out. I'm fitting 'US spec' indicators and although it seemed like they would be a straightforward fit so far it has proven not to be the case! The back part is slightly larger than the UK part and I had to remove the quarter valances and open the holes out slightly with a Dremel to get them to fit. Of course regular readers may remember that I resprayed one of my quarter valances a while back. Unfortunately when taking the passenger side off I realised that it was just as bad (if not worse) as the drivers side had been so I reluctantly set to work on it.
I quite enjoy bodywork and I've been asked a few times how to do things like this so I might as well go through it in detail! First of all I stripped the mix of paint and Dinitrol off it using a knotted wire brush in an angle grinder and a wire brush on a drill for the tricky bits. Once the paint was off I had a good look at it and saw a few dents and dings here and there that would need a bit of filler and a few pitted areas that would need some rust killer. After cleaning off the remaining rust killer with thinners I gave it a good thin coat of Upol Acid #8 which highlighted all the bumps!

When that had dried I used a few thin smears of Isopon P38 to fill all the low points. After letting that dry I sanded it flat with a sanding pad on an electric 'delta' sander. The trick here is not to use a sanding pad which is too course or too fine. You don't want to 'polish' the filler but neither do you want to leave marks in it which might show through the paint! Also when you're sanding back don't worry about taking the paint around it off. You just need to respray it again like so.
 If you think there are some more dents on the left hand side then you're wrong! Those are just the spot welds where the inner skin of this panel is attached. So now we've got a lovely dent free panel waiting for some more paint...
I think I'll carry on with this tomorrow!
Anyway, it's given me lots of energy to work on the Spitfire! I've had a good look at the parts I bought while I was abroad and I'm going to be fitting them and getting the car ready for the dreaded MOT over the next few weeks.
First thing I noticed when I stuck my head around the garage door was that the suspension has settled a fair bit since I fitted the wheels. The second thing I noticed was an oil slick! Looks to me like the sump plug is leaking a bit. I'm not quite sure what's happened there but I'll be having a look over the next few days. Another problem lies with the brake master cylinder. It's empty! I'm going to investigate and also replace the hose lines with some swivel fittings as I've never been happy with how the flexi hoses attach to the master cylinders.
I tried to push the car out of the garage and onto the drive the other day too but ran into some problems there as well. It didn't want to budge! I checked the handbrake and it wasn't on. I'd left it off deliberately to stop this sort of thing happening! Having rocked it back and forth a bit I've decided that it isn't a brake problem but it might be due to having a couple of flat tyres. I'll hopefully be sorting that soon!
I have done a few jobs already though. Firstly, I fitted my new number plate. This was a relatively easy one. I was careful to mount it at the right height and to get the holes in the right place. It worked out rather well and all I had to do was spray the plastic mounting screws black and fit it up. Looks good I think!
Then I began working on getting the lights sorted out. I'm fitting 'US spec' indicators and although it seemed like they would be a straightforward fit so far it has proven not to be the case! The back part is slightly larger than the UK part and I had to remove the quarter valances and open the holes out slightly with a Dremel to get them to fit. Of course regular readers may remember that I resprayed one of my quarter valances a while back. Unfortunately when taking the passenger side off I realised that it was just as bad (if not worse) as the drivers side had been so I reluctantly set to work on it.
I quite enjoy bodywork and I've been asked a few times how to do things like this so I might as well go through it in detail! First of all I stripped the mix of paint and Dinitrol off it using a knotted wire brush in an angle grinder and a wire brush on a drill for the tricky bits. Once the paint was off I had a good look at it and saw a few dents and dings here and there that would need a bit of filler and a few pitted areas that would need some rust killer. After cleaning off the remaining rust killer with thinners I gave it a good thin coat of Upol Acid #8 which highlighted all the bumps!
When that had dried I used a few thin smears of Isopon P38 to fill all the low points. After letting that dry I sanded it flat with a sanding pad on an electric 'delta' sander. The trick here is not to use a sanding pad which is too course or too fine. You don't want to 'polish' the filler but neither do you want to leave marks in it which might show through the paint! Also when you're sanding back don't worry about taking the paint around it off. You just need to respray it again like so.
If you think there are some more dents on the left hand side then you're wrong! Those are just the spot welds where the inner skin of this panel is attached. So now we've got a lovely dent free panel waiting for some more paint...I think I'll carry on with this tomorrow!
Sunday, April 20, 2008
Number Plate
I've been at it again - thinking about my cars aesthetics! My latest purchase is a new number plate for the front of my Spitfire.
I've been messing around with the front of the car since I bought it! When I first got it it came with an absolutely massive plate that blocked off virtually the whole of the radiator grill. Unsurprisingly there were some cooling issues! I'm sure they were largely due to the radiator, which was standard size and looked like it had seen better days, but the huge plate didn't help!
To sort it I fitted a wide radiator and cut the edges of the plates off, leaving the minimum legal distance between letters and the edge of the plates. The cooling problems were sorted but I still wasn't happy with how it looked. There was only so much chopping down I could do with the letters as big as they were (way bigger than the legal minimum size!) and I was left with square edges on each side which looked a bit odd! Something had to be done...
I looked at various options. Stick on plates didn't do it for me. I don't like the way they look mounted almost horizontally on the bonnet. I don't like the look of plates mounted on the spoiler either so that only left me with the option of using a smaller plate in the standard location.
This is where things got a little bit err....complex. In order to get what I wanted I was going to have to bend and break a few laws. Basically, I wanted a 3/4 size plates and these aren't strictly road legal. After doing my homework and looking on a few forums I couldn't find anyone that had been pulled over for having a smaller front plate so I decided to go for it.
This led me to the next problem. Getting number plates made is supposed to involve lots of hassle with ID and proof of ownership and stuff. The way the number plate sellers get around this is by selling plates that are for 'show' only. So without all that hassle I got http://www.fancyplates.com/ to make one up for me. It looks great and arrived the next day. So for good service they get recommended by me!
I've been messing around with the front of the car since I bought it! When I first got it it came with an absolutely massive plate that blocked off virtually the whole of the radiator grill. Unsurprisingly there were some cooling issues! I'm sure they were largely due to the radiator, which was standard size and looked like it had seen better days, but the huge plate didn't help!
To sort it I fitted a wide radiator and cut the edges of the plates off, leaving the minimum legal distance between letters and the edge of the plates. The cooling problems were sorted but I still wasn't happy with how it looked. There was only so much chopping down I could do with the letters as big as they were (way bigger than the legal minimum size!) and I was left with square edges on each side which looked a bit odd! Something had to be done...
I looked at various options. Stick on plates didn't do it for me. I don't like the way they look mounted almost horizontally on the bonnet. I don't like the look of plates mounted on the spoiler either so that only left me with the option of using a smaller plate in the standard location.
This is where things got a little bit err....complex. In order to get what I wanted I was going to have to bend and break a few laws. Basically, I wanted a 3/4 size plates and these aren't strictly road legal. After doing my homework and looking on a few forums I couldn't find anyone that had been pulled over for having a smaller front plate so I decided to go for it.
This led me to the next problem. Getting number plates made is supposed to involve lots of hassle with ID and proof of ownership and stuff. The way the number plate sellers get around this is by selling plates that are for 'show' only. So without all that hassle I got http://www.fancyplates.com/ to make one up for me. It looks great and arrived the next day. So for good service they get recommended by me!
Saturday, February 09, 2008
Roller Rockers
I've been busy this week looking out for parts going cheap! I'm going to have a few jobs to do on the Spitfire in the future and I really want to get all the parts aquired so I can just do it next time I've got some time off. One of these little jobs has been brought about by a steady drip of oil under the car. It can only be coming from the rear oil seal so basically either the engine or the gearbox will have to come out to fit a new one. I'm not in the business of doing anything by halves either so there will be a mass upgrading in that area while the engine is out. I'm going to go for one of those light flywheels (either a Canleys steel or a Firdanza alloy one) and an alloy bellhousing. Of course I'll chuck in the AP clutch and the alloy backplate I've already got, bolt it all back together (I've heard Chevy flywheel bolts are a good upgrade) and I should be good to go!
My other little job is to finish off my cylinder head. I still need to finish the exhaust ports off and get a pro to fit bigger valves for me. Basically the lot need doing. It need new guides, valves and springs. It's sounding more expensive by the second!
Despite saying only recenly that I would be smoothing and polishing some rockers up I had a change of plan. Ebay turned up some Harland Sharp roller rockers that were going suprisingly cheaply. A bargain for just £84! I love Ebay!

My other little job is to finish off my cylinder head. I still need to finish the exhaust ports off and get a pro to fit bigger valves for me. Basically the lot need doing. It need new guides, valves and springs. It's sounding more expensive by the second!
Despite saying only recenly that I would be smoothing and polishing some rockers up I had a change of plan. Ebay turned up some Harland Sharp roller rockers that were going suprisingly cheaply. A bargain for just £84! I love Ebay!
Thursday, January 24, 2008
Wheels!
I've finally got around to something I've been meaning to do for ages! After all this time I've finally joined Club Triumph! Now if I can only stay in the country long enough I can enter the RBRR or maybe even the 10CR!


For some reason it now looks a bit higher off the ground than it did before. I rolled it backwards and forwards to let the suspension settle but it still seems to sit higher than before. I'll have to take it for a run and see how it looks after that before I decide what to do about it. I can just wind the AVO's down at the front but it looks like I may have to fit a lowering block at the rear. Thats another project for another time!
I've also recently joined Davesideways' new forum (http://www.sideways-technologies.co.uk/) and it looks to be shaping up quite nicely as good read for people who love their modified classics. I've already had a few more ideas that I will get around to another time. With me being on the other side of the world I don't think this is going to get updated too often over the next few months but I may have some news about parts I'm trying to aquire. Watch this space!
I also finally got around to finishing off my slotmags. I was in a mad rush to get them done and on the car before I had to return to New Zealand. I had a morning to apply the last coats of paint, get them balanced and then finally fit them to the car! It seemed like mission impossible but I got it done just in time to take a few photos, pack my stuff and get on the plane! Of course there were a few hitches along the way. I couldn't get my hydraulic trolley jack under the front crossmember because the car's too low so I had to use a screw jack to raise it a couple of inches before I could slide the trolley jack under. I still need to polish the rims some more and I really need to get hold of some centre finishers to finish the job off but I think it looks pretty cool!
For some reason it now looks a bit higher off the ground than it did before. I rolled it backwards and forwards to let the suspension settle but it still seems to sit higher than before. I'll have to take it for a run and see how it looks after that before I decide what to do about it. I can just wind the AVO's down at the front but it looks like I may have to fit a lowering block at the rear. Thats another project for another time!
I've also recently joined Davesideways' new forum (http://www.sideways-technologies.co.uk/) and it looks to be shaping up quite nicely as good read for people who love their modified classics. I've already had a few more ideas that I will get around to another time. With me being on the other side of the world I don't think this is going to get updated too often over the next few months but I may have some news about parts I'm trying to aquire. Watch this space!
Thursday, January 10, 2008
Finally! An Update!
Okay so its been a long time coming but here's the first update in quite some time! I've been busy over christmas but not on the car sadly...

I also thought I'd treat myself to an alloy alternator bracket (again from Canley Classics). I know its not going to save a tonne of weight but it sure does look cool!
 I've also had a chance to check out the rocker spacers. I might well take the rocker shaft out and rebuild it while I'm out in NZ to give me something to do on the boring days I'm not flying! I may even take the Dremel out there and smooth and polish the rockers up!


 And finally a request for help! Anyone know how to remove the standard type of mirrors that come come on a Spitfire? I've only got one on the drivers side and theres a screw sunk into a recess on the back of it but it dosent seem to want to move! Do I have to get at it from the inside of the door?
I got back from NZ on the 28th of November and since then seeing the girlfriend, christmas and pilot exams have all taken their toll on my spare time but that dosent mean I havent been busy getting a few bits sorted out for the car!
I've always said that that time and money are the two biggest factors in how I work on my car. Sometimes I've got time and no money so I lighten up some stuff or do a few little jobs and sometimes I've got more money than time and I buy some nice shiny bits! I've not had the time recently so the shiny bits have been rolling in!
Here's a few bits and bobs I've recently aquired. First off is something I've been after for a while - an alloy engine backplate. I bought one of these from Dave 'Sideways' Powell a while back but postal incompetance meant that it never arrived so I bought one from Canley Classics the other week.
Wierdly it looks smaller when it's not on the car! Looks nicely made with all the holes in the right place so it gets the thumbs up from me! Not planning to fit it at the moment so I'll probably just chuck it in the parts box untill I can fit it. I'll probably leave it till I replace the clutch and chuck in a lightweight flywheel, race clutch, alloy bellhousing etc etc.
I also thought I'd treat myself to an alloy alternator bracket (again from Canley Classics). I know its not going to save a tonne of weight but it sure does look cool!
I've also had a chance to check out the rocker spacers. I might well take the rocker shaft out and rebuild it while I'm out in NZ to give me something to do on the boring days I'm not flying! I may even take the Dremel out there and smooth and polish the rockers up!I've also been working on the wheels I bought. It's been an epic mission to strip all the old paint off. There were about four layers and each seemed to be better applied than the last. It took a whole bottle of nitromoors to get it sorted and even then it took an epic amount of time with wire wool and wire brushes to get the final bits of paint off! I'm still finishing them off but one is painted up nicely and the result is pretty good. What do you think?
Of course I had to get some nuts to bolt them up. I will eventually upgrade the studs, but for now I bought nuts to fit the standard size studs. I got them from Speedshack and I can thoroughly recommend them. They knew exactly what they were talking about and got them delivered in double quick time so they get a recommendation from me!
I'm also trying to fit the 'all orange' indicators that 'GT6Steve' sent me from Las Vegas but I've run into a bit of a stumbling block. It seems that the fitment of them to a UK spec spit is not as straightforward as it would seem. The bulb holding back part of the light is bigger than the UK ones so it needs the hole opening up with the trusty Dremel!
And finally a request for help! Anyone know how to remove the standard type of mirrors that come come on a Spitfire? I've only got one on the drivers side and theres a screw sunk into a recess on the back of it but it dosent seem to want to move! Do I have to get at it from the inside of the door?Wednesday, November 07, 2007
Magnificent!
Finally some luck came my way! I was having a look on ebay when I came across this set of 6x13 Wolfrace slotmags going for just £80. Should be absolutely perfect fit on the Spitfire and they're already fitted with 4 Yokohama Advan A032R tyres. Perfect for the type of driving I've got in mind!
I should be returning to the UK at the end of this month and I plan to get the spitfire drivable again in the short time I'm at home. Bleeding the brakes and refurbing and fitting the wheels are my number one jobs.
Here's the picture from the ebay listing. As you can see these are the original Wolfrace wheels with the squarer slots. I was planning to go for the Alleycat slots with the more rounded holes but I eventually decided the squarer holes would suit the car better. I plan to spray the centres black (or possibly anthracite) and polish the rims to a high shine. Can't wait to see how it looks!

I should be returning to the UK at the end of this month and I plan to get the spitfire drivable again in the short time I'm at home. Bleeding the brakes and refurbing and fitting the wheels are my number one jobs.
Here's the picture from the ebay listing. As you can see these are the original Wolfrace wheels with the squarer slots. I was planning to go for the Alleycat slots with the more rounded holes but I eventually decided the squarer holes would suit the car better. I plan to spray the centres black (or possibly anthracite) and polish the rims to a high shine. Can't wait to see how it looks!
Wednesday, September 12, 2007
Plans
Not being in the UK has been a major disadvantage this month! There was a set of Alleycat slot mags (5.5J size) for sale on ebay and they looked to be in decent condition with Pirelli tyres. The guy wanted them collecting though and thats a little difficult with me out of the country! It's a real shame as they would have been ideal for refurbishing and fitting to my car. Oh well, I'm sure something else will come along!
I've also got my eye on a pair of Halogen headlights with built in sidelights so that I can finally get around to fitting up the US style indicators that 'GT6Steve' sent me over from the US. It seems to be the same light unit as a Mini so I'm just shopping around for the cheapest supplier at the moment but will place an order soon!
Also about to be purchased is another essential for my 'killer' top end rebuild. I'm ordering a set of steel spacers for the rocker shaft from Moss Europe. Should give me a more positive location of the rockers than the springs that are fitted as standard. The spacer set is a bargain at around £12 but plus the postage and VAT is more like £22. Obviously VAT isn't their fault but that makes the postage the best part of £8. Seriously, how do these companies get away with it?
I've also got my eye on a pair of Halogen headlights with built in sidelights so that I can finally get around to fitting up the US style indicators that 'GT6Steve' sent me over from the US. It seems to be the same light unit as a Mini so I'm just shopping around for the cheapest supplier at the moment but will place an order soon!
Also about to be purchased is another essential for my 'killer' top end rebuild. I'm ordering a set of steel spacers for the rocker shaft from Moss Europe. Should give me a more positive location of the rockers than the springs that are fitted as standard. The spacer set is a bargain at around £12 but plus the postage and VAT is more like £22. Obviously VAT isn't their fault but that makes the postage the best part of £8. Seriously, how do these companies get away with it?
Monday, August 06, 2007
Valve Caps
I'm still really busy flying planes at the minute but I've still managed to fit in some shopping for Triumph parts!
I have been meaning to do some more work on the top end of my engine for some time now and my new 'killer' cylinder head is just the excuse I need to do it! Theres no point in putting so much effort into modding a cylinder head only to build it up with the standard Spitfire 1500 rocker gear!
I'm going to keep the standard rocker shaft (although obviously I'll replace it if it's knackered!) and either use polished standard rockers or roller rockers from TSI Imported Auto along with a TriumphTune (Moss Europe) rocker spacer kit to more positively locate the rockers over the valves. I've just bought these alloy valve caps from ANG Triumph. I'm not sure how much difference they'll make and if they aren't sufficiently strong they could cause an expensive mess! Apparently they are half the weight of the standard steel caps though so I'm going to reserve judgement on them till I'm back in the UK and can check them out myself. I'll probably lighten my cam followers and fit tubular pushrods and call the job a good 'un!

I have been meaning to do some more work on the top end of my engine for some time now and my new 'killer' cylinder head is just the excuse I need to do it! Theres no point in putting so much effort into modding a cylinder head only to build it up with the standard Spitfire 1500 rocker gear!
I'm going to keep the standard rocker shaft (although obviously I'll replace it if it's knackered!) and either use polished standard rockers or roller rockers from TSI Imported Auto along with a TriumphTune (Moss Europe) rocker spacer kit to more positively locate the rockers over the valves. I've just bought these alloy valve caps from ANG Triumph. I'm not sure how much difference they'll make and if they aren't sufficiently strong they could cause an expensive mess! Apparently they are half the weight of the standard steel caps though so I'm going to reserve judgement on them till I'm back in the UK and can check them out myself. I'll probably lighten my cam followers and fit tubular pushrods and call the job a good 'un!
Sunday, July 15, 2007
More future mods!
Okay, so here I am posting after saying that I wouldn't be adding anything to this blog for at least 6 months! I have a fair bit of spare time and I thought I'd use it to introduce some of my future plans for the car by outlining just a couple of future mods per month! Here are this months 2 mods then!
I need to get my bonnet sorted because the inner wheelarch panels are rusted to bits and I'll probably loose the seam that seperates the bonnet and front wing panel. I'd want to get it seam welded properly of course rather than just bunging it up with filler so I can get it looking like this photo I copied off US Ebay of a rather nice racing GT6!

 With the centres painted black and the rims cut and polished I think these look absolutely great. Different and with more than a hint of drag racer style, I've almost certainly made my mind up to get some of these, paint them up and try them out on my car to see how they look! I think these are made by Alleycat because the Wolfrace ones seem to have slightly squarer holes so I'll be on the lookout on ebay as soon as I get back to the UK!
I need to get my bonnet sorted because the inner wheelarch panels are rusted to bits and I'll probably loose the seam that seperates the bonnet and front wing panel. I'd want to get it seam welded properly of course rather than just bunging it up with filler so I can get it looking like this photo I copied off US Ebay of a rather nice racing GT6!
I've also been thinking about what wheels to go for. On the Spitfire the choice basically comes down to mililite style wheels, Revolutions, wider Dunlop steels or 'slot mag' type wheels. Minilite style wheels very in quality and in my opinion the only decent looking brands are Minilite, Superlite and the Compomotive ML's. Trouble is though the minilite style wheel has been done to death on just about every classic car ever made and I want a different look for mine!
So that leaves a choice between 5.5J Dunlops steels, Revolutions and Wolfrace slot mags. I like the 4 spoke Revolutions on GT6's and I think they look good on early Spitfires but I dont think they suit the later Spitfires very well. They look a bit too open for my tastes whilst the 5 spoke versions are super rare and almost certainly out of my price bracket even if I could find some!
Dunlop 5.5J's are nice and wide but they look pretty much the same and I really fancy a change. So that leaves just 'slot mags' which I always thought looked cheesy on Triumphs, but that was until I saw this photo on the Club Triumph messageboard!
With the centres painted black and the rims cut and polished I think these look absolutely great. Different and with more than a hint of drag racer style, I've almost certainly made my mind up to get some of these, paint them up and try them out on my car to see how they look! I think these are made by Alleycat because the Wolfrace ones seem to have slightly squarer holes so I'll be on the lookout on ebay as soon as I get back to the UK!
Subscribe to:
Posts (Atom)