Monday, October 24, 2011

Pimp My Drill!

My first project on the lathe is complete! I've created three knobs for the end of the feed handles on my pillar drill. They're not very complex, which is why I thought they would be a good first project to get used to the lathe!

I started off by cutting a length of 2cm diameter aluminium bar into three 5cm sections. I then faced both ends of each piece and worked them until they were all within 1/10th of a mm and then I centre drilled and tapped each piece. After a quick tool change, I turned each piece just to clean then up a bit, before putting a slight bevel on the tops to loose the sharp edge.

I then set the thing up to do some tapering. The Unimat has a really neat headstock that can be twisted. That puts the work at an angle and allows tapered pieces to be created really easily. After making a couple of passes to neaten it up I was done!

This is the drill as purchased - with nasty black plastic knobs.

The freshly turned aluminium replacements!


I think they look pretty good! They aren't perfect but I am very impressed with the finish on them. I still have a few things to learn before I make a few bits up for the car though! If anyone knows a good tip for stopping the chuck marking a previously worked surface I want to hear it - it'll save me a fair bit of polishing next time!

Monday, October 17, 2011

Lathe

Things have been going very slowly around here for the last few months! Work, other projects and a back injury followed by a foot injury have conspired against me!

Despite being busy, I have managed to do a small amount of work on the Spitfire. The windscreen is now out and didn't reveal too many horrors - just a little rust in the rain channels! The bonnet is now stripped down completely apart from the rear bonnet cone panels. I want to keep these on for as long as possible to get the right shape but I really need to sort out the bit where they meet the bonnet wing flange. There are three panels spot welded together here and rot has, rather unsurprisingly, taken hold. I think the easiest solution is going to be to chop it out and let some new metal into the flange before tackling the cone panel and then the wing.


Once I have repaired all the panels, I need to start getting them cleaned up and I've made a bit of an investment in a 3hp compressor from Jawel Paints so that I can get some grit blasting done. Grit blasting has a bit of a bad reputation with classic car restorers and a quick read of the Internet might have you believe you were practically guaranteed rippled panels. The reality of it is, though, that damage to panels like that can only be caused by industrial equipment and is not something that can easily be achieved at home!

To complete the kit, I bought a cheap sandblasting gun from Machine Mart which may or may not be any good (I haven't tried it yet!) and some J-Blast Supafine grit which came highly recommended on the MIG welding forum.

One of the other projects I have just finished is this mini lathe. I bought it off eBay as a complete wreck. It's an Emco Unimat design made by Elliott Machine in the UK. There is a huge following for these little lathes and parts crop up fairly regularly on eBay. According to http://www.lathes.co.uk/unimat/ my lathe is a Mk4 Unimat and probably originated from around 1959 - 1960.


I started the restoration off by stripping the paint. I couldn't decide if this was original or not but I guessed not because it looked like green Hammerite and it was literally slapped all over everything (including the plastic motor brush caps) but I have since seen a few finished like this! Either way, it got a few coats of the same grey POR15 I used to repaint my gearbox.


The rusty metalwork got a thorough dunking in derusting solution, whilst the seized chuck got a thorough soaking in penetrating oil followed by a bashing against the soft wood of my workbench!


The trickiest bit by far was the motor. Unimats are powered by a U-90 motor made in Holland by Motoren Eindhoven. Its a nicely made motor and has big 'Oilite' bearings but suffers from a low duty cycle. For every 8 minutes it's in use you have to let it rest for 2! It did work when I got it, but I took it apart anyway to repaint and instantly realised that all was not well with it. For a start, there was some very dodgy soldered connections inside that had been left bare and, secondly, there was supposed to be a suppressor inside. The only trace it had ever been there was a couple of soldered tags!

This was a bit of a problem. The motor would run without the suppressor but the brushes would wear rapidly. Unfortunately, the original type of suppressor hasn't been available for years and the only one available is too large to go inside the motor. I decided that the only real option was to use a suppressor from Maplins and mount it outside the motor.

Fitting the suppressor and putting on a new flex involved a lot of fiddly soldering in a very dingy, confined space but I eventually got it done! I find a soldering gun rather than a soldering iron makes these unpleasant jobs much more straightforward, not least because mine has a light on the front that comes on when the trigger is pulled!


The last job was to fit a new switch and plug. The originals were Bakelite and had seen much better days!

That's it! After a few false starts (due to a brush not making contact) the motor ran up nicely and sounded much healthier than it did before. All that's left to do on it is to heatshrink the suppressor to the cable to tidy it up and think of some things to make on it. My drill press has some nasty plastic bits on the feed handle that could be replaced by something nicer so I think that might be my first project.

Tuesday, May 24, 2011

Tool Trolley

I've not had much time to work on the car in the last month or so but I did manage to find enough time to do a few small jobs on the bonnet. First of all, I spent a good few hours grinding off all the remaining spot welds on the bonnet flanges. I also discovered a bit of rust on one side where the bonnet support tube bolts up to the flange. It looks like water has been trapped between the support tube and flange and has rotted both. Fortunately, the bonnet flange was easily repaired whilst the support tube is probably best replaced.


I'm getting better at these small welding jobs! I've discovered that the secret to really neat welds is accurate 'fit up'. Time spent making the repair sections fit definitely pays off when it comes to the welding!

I still need to sort out the bonnet cone mounting panels at the back edge of the bonnet. For the time being I'm leaving these on to help with aligning the wings but they'll eventually be replaced. Thanks to eBay, Canleys and a couple of panels I got donated from a failed restoration, I've almost got all the panels I need and I should be able to start the rebuilding process soon.

Another project I've been working on recently is a tool trolley. I'm still waiting on a few panels so I thought I'd fill the time by making a tool trolley. Basically these are wheeled carts used to store parts and tools while working. You can buy them, but they either seem to be cheap and a bit rickety looking or solidly built but expensive. I wasn't after anything fancy but I did want a well built, stable cart and I wanted it to be a bit higher than normal because I'm tall! I also thought about building in a power strip so I can plug all the power tools onto the trolley and then just plug the trolley in. Sounds like a good idea, huh?


I started by cutting up some 25mm box section with my new Evolution 'Fury' saw (a recent purchase on a 'VAT free' day at Machine Mart). I'm using 1.5mm wall thickness to keep it light.


The trickiest bit so far has been the handle! I used a holesaw in a drill press to make the tube fit against the box section sides of the handle. This worked a treat and all I had to do was cut the angles on the chop saw and weld it up.


It's coming on nicely! Thanks to eBay, I have some decent size lockable castors and thanks to Banbury Plastic Fittings (www.bpfittings.co.uk) I have the inserts that the castors bolt up to and various plastic plugs to seal the ends of the tubes. I was quite pleased to find this company, as everywhere else seemed to have a minimum order quantity or was only open to the trade.


That's it so far! I'll let you know how it turns out in a future blog post!

Saturday, March 05, 2011

More Bonnet Metalwork!

There's not been much to write about going on with my car recently. I've been slowly working on the bonnet to get it back into tip top condition before I weld any new panels to it.

One of the jobs that needed doing was the removal of the remaining scraps of the headlight support panels. These came off easily enough elsewhere but I couldn't remove the last bit of them where they met the corner of the bonnet. It looked like they'd been brazed in and it wasn't the easiest work in the world to separate the two without damaging the bonnet. In the end it wouldn't fully separate without me cutting a bit out of the bonnet flange off! This was annoying but easy to fix so I set about making a 'corner piece' from a bit of scrap panel. This was easy enough but made slightly more complicated by the fact there was a spot weld drill hole in the middle of the intended join between the two panels!


I was really concerned about the heat distorting the tiny repair section so I clamped a couple of scrap bits of 3mm alloy behind to take some of the heat out.


I did the welding really slowly - just a spot at a time. I did have a small issue where the the welder 'ate' the edge of the metal but I soon built it up with weld again!


I ground the weld back with a flap disc on an angle grinder. While I was doing this I noticed a definite 'ridge' along the front of the panel. I initially thought this might be a lap weld - maybe part of some dodgy repair!? I decided to investigate! I swapped the disc on the angle grinder to a cleaning fleece and ran it along the ridge. To my relief, all I could smell was hot filler! The relief was short lived though because I decided to follow the filler up the panel and as I was getting closer to the nose it was getting thicker - much thicker! To be fair, it could have been so much worse - I think I was pretty lucky to uncover a fairly minor dent.

Dents are really difficult to get a handle on so, in order to see the full extent of the damage, I sprayed the panel with some blue paint and sanded it with wet and dry on a cork block. The remaining blue paint shows up the dent!


There's nothing really wrong with using filler for something like this but, with easy access to the back of the panel, it'd be a shame not to have a go at knocking it out! Obviously, with no panel beating experience whatsoever, this was not going to be easy. But if you can't learn something from watching a few Youtube videos, buying a 7 piece panel beating set from Machine Mart and practicing on a few old panels is not worth learning - right!? It took about an hour of hammering and dollying but I think the result is worth it!

Sunday, January 30, 2011

Bonnet Welding

I've spent the last month or so practicing my welding whilst continuing to strip down the bonnet. I'm quite enjoying learning to weld. I'm getting good results and it seems to be quite straightforward. If I'm honest, I think I'm being flattered by my equipment!

I stripped off the mangled remains of the panels behind the headlights and ground the remains off the bonnet strengthener panel. I was planning to reuse the strengthener panel but it was too far gone to reuse so I ended up drilling it out as well.


Like a lot of Spitfire bonnets, mine had the 'classic' cracks around the bonnet corners. These are caused by the bonnet flexing when the bonnet is opened from one side. On mine, the lack of metal around the headlights had actually caused the alloy headlamp cowls to crack as well!

Replacing the alloy headlamp cowls is straightforward enough. I actually bought a drivers side cowl on eBay for 99p. The listing ended on Christmas day and nobody else bid!

The bonnet welding was a bit trickier. I started by practicing my butt welding technique on one of the old wheelarch panels.


That went ok, so I started on the bonnet cracks. The metal is thin here so I took it slow and set the welder on the lowest power setting. It's important not to distort the panel when welding stuff like this so I used short bursts of welding and a thicker piece of metal behind to stop the panel getting too hot. I'm pleased to say it worked a treat and, after grinding it back, you can't even see the welds.

I also bought myself a new toy this month! Machine Mart sent me an invite to a VAT free day and I used the opportunity to snap up a pillar drill. It's not the most top quality tool in the world but, for £50, I can't complain!

Thursday, December 30, 2010

Safety First!

I've been thinking a bit about workshop safety recently. It all started about the time I bought my new welder. As I hinted in a previous post, I thought it was about time I started learning to MIG weld, so I treated myself to a Clarke 160TM from the Weldequip shop at www.mig-welding.co.uk.

Obviously, being new to MIG welding, I had to invest in the appropriate safety gear. There's a really good forum attached to the Mig welding website and virtually everyone on it recommended the auto dimming type of mask. I picked up a 'SIF Lite' mask off eBay for a very reasonable £45. This dims automatically when you look at bright light and should be just the job! In terms of clothing, I picked up a 'Silverline' apron (£6.89) on eBay and a pair of ESAB MIG gauntlets (£7.85) from the Weldequip shop.

My shopping list would have stopped there - but one of the guys on the Sideways Forum mentioned the importance of having a fire extinguisher. This got me thinking! Obviously, I've always had a workshop fire extinguisher but had I ever really looked at it properly? tested it? did I even know how to use it!? I took a good look at it and a few things began to worry me. Firstly, I couldn't even begin to guess at how old it was! It actually had the MOD 'arrow' mark on it which means it was most likely obtained by my dad when he still lived in London. That would've been in the '70's! Secondly, it didn't have a pressure gauge so I couldn't tell how full it was. Obviously this was no good, so with the knowledge that I'd be replacing it anyway, I decided to see if it worked. Worryingly, but not unsuprisingly, it didn't work at all.

So, with a decent CO2 fire extinguisher on the shopping list, my thoughts turned to my other workshop safety gear. I've actually been pretty good with safety gear in so much as I've got it and I use it, but was the stuff I had any good?

In terms of eye protection, I've always used a pair of safety glasses for general work and a pair of goggles for grinding. The glasses came free with a garden strimmer about 15 years ago and the goggles were part of a £5 'safety kit' that I got when I hired a floor sander from HSS! Both would probably have worked but neither had any kind of safety markings (CE mark etc) and the goggles were horrifically uncomfortable so both went on my shopping list. Amazingly, protective eyewear is really cheap, so there was no excuse for me not to get some! I picked up a pair of Bolle 'Spider' glasses (good for impacts up to 45m/s and CE marked) for £5.45 (eBay) and a pair of Bolle 'Blast' goggles (120m/s impact protection and CE marked) for £5.99 (also from eBay).

For ear protection, I've always just used cheap disposable foam earplugs. Now I'm doing grinding on an almost industrial scale, I thought it was about time I got something a bit better, so I invested in a pair of Peltor 'Optime 1' ear defenders. These are good for general workshop use and cost just £8 from eBay. I have actually used the military spec versions of these whilst shooting in the past so I can vouch for their effectiveness!


While I was in the mood I also picked up some more gloves. OMP do a good pair of general rubberised workshop gloves for £2 (eBay) so I had a couple of pairs of those to go with the fibreglass pair I already had.

So there we go, safety equipment might not be the most exciting or fun thing in the world, but it's good to know that for less than £25, you can get good quality, stylish and up to date eye, ear and hand protection. Done!

Sunday, November 28, 2010

Bonnet Rot!

I've decided I'm going to start by sorting the bonnet out before I go on to do the rest of the car. The main reason for this is because I want to do things in manageable chunks so I don't get bogged down and I think the bonnet is a good place to start!

Having stripped off the lights last week, the next stage was to remove the bonnet catches. This was trickier than I'd imagined because of corrosion and in the end I had to get the Dremel out and grind the screws off. I made a mental note to use stainless fasteners here when I'm refitting them! I then set about removing the bonnet at the hinge boxes. I used thick cardboard between the quarter valances and the bonnet to stop it dropping down and hitting the radiator cap and carefully undid the bolts. With the help of an assistant (my mum!) I lifted the bonnet clear and stood it up on its back edge.

With the bonnet like this I could get a good look at it. To be honest, it was a pretty sorry sight! I had a good poke around and managed to make some pretty big holes with a screwdriver. There was also filler, glassfibre and copious quantities of extra steel sheet welded in! It was time to start sorting all this out!

I thought I'd start with the ropey wheelarches so I cleaned up the edge of the drivers side wheelarch using a 'Dronco' cleaning fleece, with the intention of finding the spotwelds and drilling them out to release the wing. Imagine my surprise then to find - no spotwelds! It seems at some stage, someone had badly seam welded them in! I really needed the arch out of the way so I could get at the wing spotwelds so there wasn't really an alternative other than to just cut through the outer arches. I used a Clarke 1mm 'plasma cut' cutting disc on an angle grinder to slice through it and aviation snips to cut back the edge.

While I had the snips out I removed a previous owners modification - a piece of plain sheet steel welded under each of the headlight strengthener panels. Guess what I found underneath? If you guessed rust - you're right!


With those cut out, my next job was to remove the passenger side wheelarch. I had hoped to reuse the inner arch panel on this side but when I pulled it away from the bonnet support tube bracket, I realised the metal I was looking at was on the bracket and the panel had a hole in it! The outer on this side was particularly bad - there were three layers in some places and very crusty! The cutting disc made hard work of this and I was forced to split the various layers with a chisel and then cut them out!


I had hoped to reuse a wing and one of the inner arch panels but on closer inspection it looks like I'll be fitting two new wings, inner and outer wheel arch panels on both sides and two new headlight stiffener panels. Basically, that's all the panels other than the main bonnet panel and the strengthener panel in the nose!

Monday, November 15, 2010

Big Decisions!

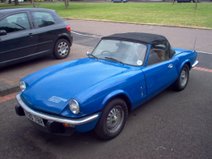
Over the last few months I've come to the inescapable conclusion that the time has come to properly restore my car! The last 7 years have taught me a lot about Triumph Spitfires - how they work, why they don't and, above all, the importance of top quality workmanship! Whenever I've had a job to do I've always tried to do it to the best of my abilities regardless of the time taken or, at times, the financial cost! The results of my labour is a car that is pretty much mechanically sorted. The bodywork however, is another kettle of fish. I've had a few patches welded on the floorpan in the past and needed a few more before the RBRR. This got me thinking - if I don't restore it soon it might deteriorate to the point where it's not worth doing.

I think that you basically seem to need a combination of four things to restore a car. Those four things are time, money, skills and space! When it comes to money and time, like everyone, I could do with more of both but I hope to keep the costs down by doing a lot of work myself. I also have the advantage that all the mechanical stuff is done already so I won't have the costs of that to factor in. In terms of skills, I'm going to need to learn how to MIG weld and I'm also going to have to get better at bodywork. There is really no getting away from that, those are essential! I've made a fairly serious investment along those lines but I'll discuss that another time!

In terms of space, I've really lucked out! My grandparents house is only a mile from my house and has a sizable double garage with a workshop at the back. It's full of junk but should be just fine once I've cleared it out. It has a special significance for me as well as I have many happy memories of the projects my grandad and I built in there before his death last year. Back in the 60's it was also used to build an Austin 7 special so I'm hoping it will bode well for my car! Here are a few pictures of my car settling in...


I've just started stripping it down. The front bumper, lights, spoiler, overiders and number plates are all removed and boxed up in my workshop. It begins...

Sunday, October 17, 2010

The Round Britain Reliability Run!

Better late than never! Here are some of my photos from the RBRR...


And that's it really! The car was flawless all the way around and we didn't have anything to do other than just drive. It was great fun and if you're thinking of doing it then go for it! It really is the ultimate test of man and machine!